Mastering AI Generation
Introduction
At the heart of every AI application lies the fundamental operation of generation - transforming prompts into meaningful responses. While this might seem straightforward, the reality is far more nuanced. Generation in Genkit Go isn’t just about calling an API; it’s about understanding the intricate dance between type safety, error handling, schema validation, and the non-deterministic nature of AI responses.
This chapter delves deep into Genkit Go’s generation capabilities, exploring not just how to use the Generate function, but why it’s designed the way it is. You’ll learn how Genkit’s architecture provides flexibility through provider independence, middleware patterns, and professional prompt management with Dotprompt, allowing you to build production-ready AI applications that handle edge cases gracefully.
Prerequisites
Before diving into this chapter, you should have:
- Completed Chapter 3 and have a working Genkit Go development environment
- Basic understanding of Go’s type system and error handling
- Familiarity with JSON schemas and data validation concepts
Understanding Genkit’s Generation System
Genkit Go provides a powerful generation system that balances simplicity with flexibility. Let’s explore how this system helps you build better AI applications.
The Core Concepts
At its heart, Genkit’s generation system revolves around three key principles:
- Unified Interface: All AI models - whether from Google, OpenAI, Anthropic, or custom implementations - share the same interface
- Type Safety: Leverage Go’s type system for compile-time guarantees and better developer experience
- Composability: Build complex functionality from simple, well-defined components
How Models Work in Genkit
When you use Genkit, models are identified by their unique names. While many follow a provider/name pattern, the exact format can vary by provider:
"googleai/gemini-2.5-flash"
"openai/gpt-4o"
"vertexai/claude-3-5-sonnet"
"anthropic.claude-3-haiku-20240307-v1:0"
Despite the varying formats, this naming system provides several benefits:
- Clear Organization: Know immediately which provider powers each model
- Easy Switching: Change models by updating a string - no code changes needed
- Dynamic Loading: Models can be resolved at runtime, enabling flexible configurations
- Ecosystem Flexibility: Beyond official plugins, the Genkit ecosystem includes community contributions like the AWS Bedrock plugin, expanding your deployment options
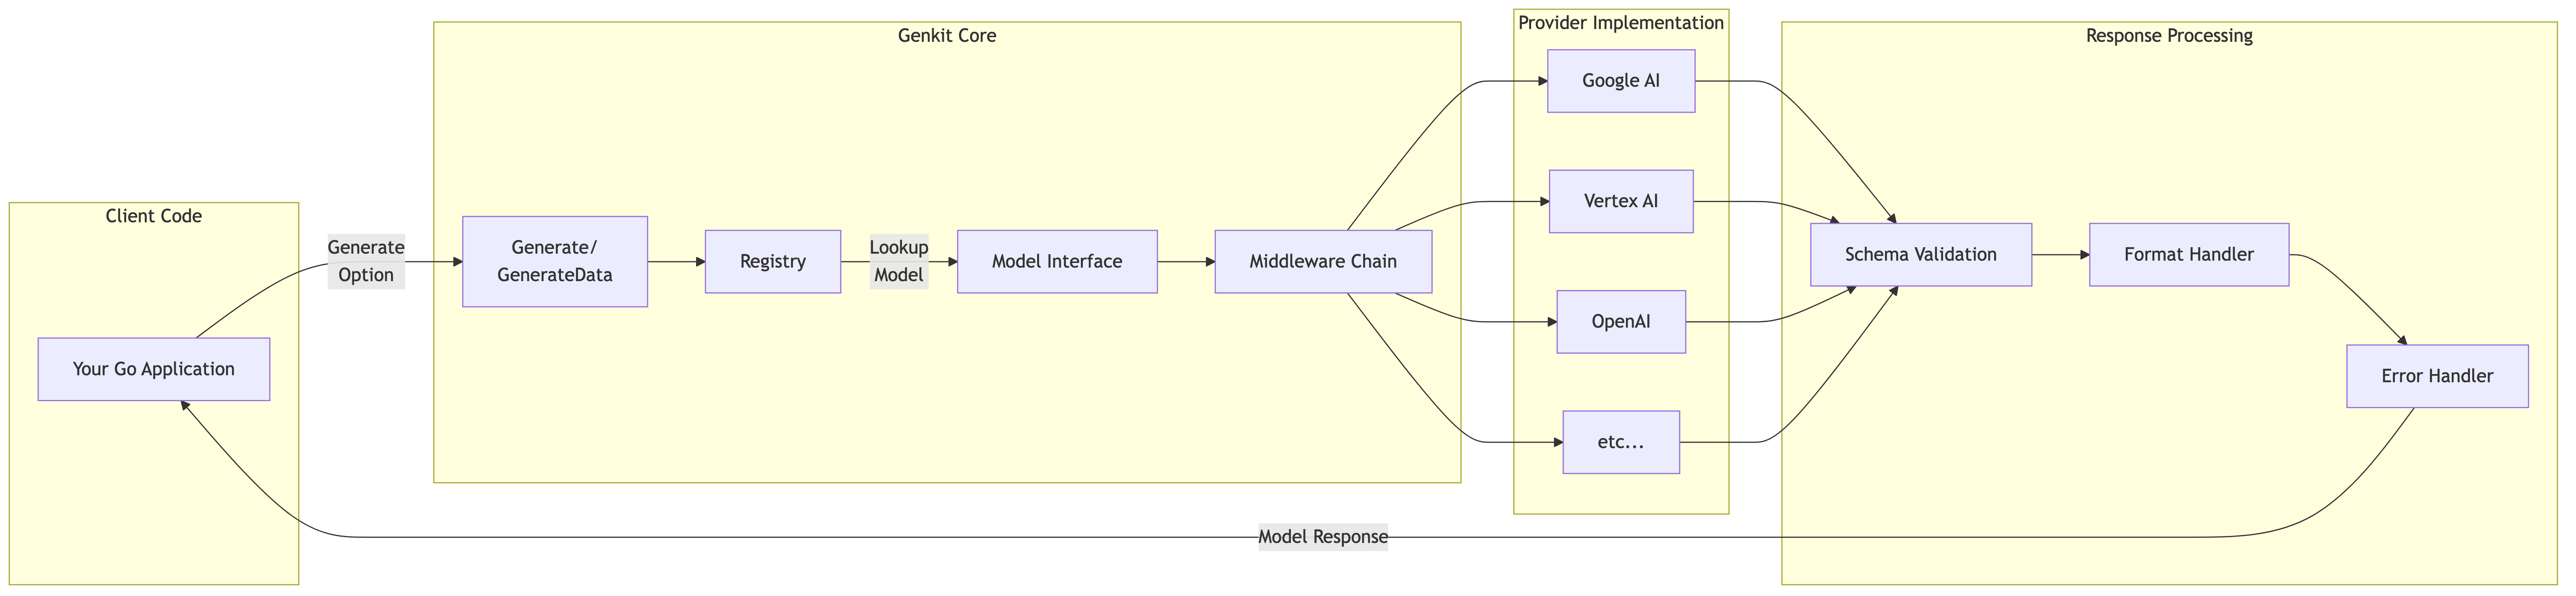
The Power of Provider Independence
One of Genkit’s greatest strengths is provider independence. While each provider requires its own plugin and configuration, the core generation interface remains consistent:
// Using Gemini
resp1, _ := genkit.Generate(ctx, g,
    ai.WithModelName("googleai/gemini-2.5-flash"),
    ai.WithPrompt("Explain quantum computing"))

// Switch to GPT-4 - same generation interface
resp2, _ := genkit.Generate(ctx, g,
    ai.WithModelName("openai/gpt-4"),
    ai.WithPrompt("Explain quantum computing"))

// Use Claude via Vertex AI
resp3, _ := genkit.Generate(ctx, g,
    ai.WithModelName("vertexai/claude-3-5-sonnet"),
    ai.WithPrompt("Explain quantum computing"))

// Or use Claude via AWS Bedrock with a community plugin
// The Genkit ecosystem extends beyond official providers
resp4, _ := genkit.Generate(ctx, g,
    ai.WithModel(
        bedrockPlugin.DefineModel(g, bedrock.ModelDefinition{
            Name: "anthropic.claude-3-haiku-20240307-v1:0",
            Type: "text",
        }, nil)
    ),
    ai.WithPrompt("Explain quantum computing"))
This design enables you to:
- A/B Test Models: Compare different models’ performance without rewriting code
- Fallback Strategies: If one provider fails, seamlessly switch to another
- Cost Optimization: Use expensive models only when needed, cheaper ones for routine tasks
Working with Generate
Genkit’s Generate function provides flexible text generation:
resp, err := genkit.Generate(ctx, g,
    ai.WithPrompt("Explain quantum computing"),
    ai.WithModelName("googleai/gemini-2.5-flash"))

// Access the text response
fmt.Println(resp.Text())

// Check token usage
if resp.Usage != nil {
    log.Printf("Tokens used: %d", resp.Usage.TotalTokens)
}
The Generate function returns a ModelResponse with full metadata access, including token usage, finish reasons, and model information.
For type-safe structured output generation, see Chapter 5: Working with Structured Data, which covers
GenerateDataand complex schema patterns.
Middleware: Extending Without Modifying
Genkit’s middleware system lets you add cross-cutting concerns—cost tracking, retries, authentication, custom validation—without changing the code that calls Generate. Starting in genkit Go v1.7.0, middleware is built around the Middleware V2 API, which can hook in at three different points during a generation:
WrapGeneratewraps each iteration of the tool-call loop. Use it when you need to see (or alter) the accumulated request as the model iterates over tool responses.WrapModelwraps each model API call. Retry, fallback, and caching middleware typically hook here.WrapToolwraps each tool execution. Useful for auditing tool usage or adding human-in-the-loop approval.
Each hook is optional: a nil field is treated as a pass-through, so a middleware only implements the hook points it actually cares about.
Before showing examples, a note on what middleware is for. Genkit already does a lot of cross-cutting work for you—every model is automatically wrapped with built-in telemetry that records LatencyMs on the response and emits an OpenTelemetry span for the call. So you don’t need to write a “logging middleware” just to get latency or token counts in your traces; that’s free. Middleware shines for the things Genkit doesn’t already do—and a great example is dollar cost tracking, since pricing is application-specific (the rates depend on which model you use, your provider contract, and so on).
Inline middleware with MiddlewareFunc
The simplest way to write a one-off middleware is ai.MiddlewareFunc, which adapts a closure to the Middleware interface. Here’s a per-call token reporter that prints how many tokens each model call consumed:
// Define token reporter inline
tokenReporter := ai.MiddlewareFunc(func(ctx context.Context) (*ai.Hooks, error) {
    return &ai.Hooks{
        WrapModel: func(ctx context.Context, params *ai.ModelParams, next ai.ModelNext) (*ai.ModelResponse, error) {
            resp, err := next(ctx, params)
            if err != nil {
                return nil, err
            }
            if resp.Usage != nil {
                log.Printf("Tokens: %d input + %d output = %d total",
                    resp.Usage.InputTokens,
                    resp.Usage.OutputTokens,
                    resp.Usage.TotalTokens)
            }
            return resp, nil
        },
    }, nil
})

// Use middleware in your generation
resp, err := genkit.Generate(ctx, g,
    ai.WithPrompt("Explain how to make perfect rice"),
    ai.WithUse(tokenReporter))
Each call prints a line of the form Tokens: <input> input + <output> output = <total> total to the server log. (The CostTracker example below shows captured output from a real run.)
resp.Usage is also available to the caller of Generate—what middleware adds is automatic observation without the caller having to remember, plus visibility into nested model calls inside a tool loop (where each turn produces its own resp.Usage). The closure returns a *ai.Hooks bundle, which is what enables a single middleware to hook into Generate, Model, and Tool simultaneously—here we only fill in WrapModel.
Reusable middleware as a struct: cost tracker
For middleware you want to share across flows—or expose in the Dev UI—define a struct that implements the Middleware interface. Below is a CostTracker that takes per-million-token rates and reports the dollar cost of every model call:
// CostTracker logs the dollar cost of every model API call.
type CostTracker struct {
    InputUSDPer1M  float64 `json:"inputUsdPer1M,omitempty"`
    OutputUSDPer1M float64 `json:"outputUsdPer1M,omitempty"`
}

func (CostTracker) Name() string { return "cost-tracker" }

func (c CostTracker) New(ctx context.Context) (*ai.Hooks, error) {
    return &ai.Hooks{
        WrapModel: func(ctx context.Context, params *ai.ModelParams, next ai.ModelNext) (*ai.ModelResponse, error) {
            resp, err := next(ctx, params)
            if err != nil {
                return nil, err
            }
            if resp.Usage != nil {
                inputCost := float64(resp.Usage.InputTokens) / 1_000_000 * c.InputUSDPer1M
                outputCost := float64(resp.Usage.OutputTokens) / 1_000_000 * c.OutputUSDPer1M
                log.Printf("Cost: $%.6f (in: $%.6f, out: $%.6f, latency: %.0fms)",
                    inputCost+outputCost, inputCost, outputCost, resp.LatencyMs)
            }
            return resp, nil
        },
    }, nil
}

// Use it the same way as inline middleware
resp, err := genkit.Generate(ctx, g,
    ai.WithPrompt("Explain how to make perfect rice"),
    ai.WithUse(CostTracker{
        InputUSDPer1M:  0.075, // example rates for Gemini 2.5 Flash
        OutputUSDPer1M: 0.30,
    }))
Name() returns a stable identifier, and New(ctx) is invoked once per Generate() call so each invocation gets its own state container if needed (counters, request-scoped caches, and so on). Notice how the middleware reads resp.LatencyMs—that field is filled in automatically by Genkit’s built-in telemetry, so your own metrics can compose on top of it instead of re-implementing the timer.
Built-in middleware: Retry and Fallback
Genkit ships a handful of common middlewares under github.com/firebase/genkit/go/plugins/middleware. Two of them earn their keep in production:
Retryretries failed model calls with exponential backoff, by default for retryable errors such asUNAVAILABLE,DEADLINE_EXCEEDED, andINTERNAL_SERVER_ERROR.Fallbackforwards the request to a backup model when the primary one fails with a fallback-eligible status.
You can compose them in a single call. The order in WithUse(...) is outer-to-inner, so WithUse(Retry, Fallback) becomes Retry { Fallback { model } }:
import (
    "github.com/firebase/genkit/go/ai"
    "github.com/firebase/genkit/go/plugins/googlegenai"
    "github.com/firebase/genkit/go/plugins/middleware"
)

resp, err := genkit.Generate(ctx, g,
    // Primary uses the auto-tracking `flash-latest` alias, which Google
    // hot-swaps to point at the newest stable Flash model with two weeks'
    // notice before each rotation.
    ai.WithModel(googlegenai.ModelRef("googleai/gemini-flash-latest", nil)),
    ai.WithPrompt("Explain photosynthesis."),
    ai.WithUse(
        &middleware.Retry{MaxRetries: 3},
        &middleware.Fallback{
            Models: []ai.ModelRef{
                // Fall back to a pinned, known-good version if the latest
                // alias fails (e.g. during a rollout or regional outage).
                googlegenai.ModelRef("googleai/gemini-2.5-flash", nil),
            },
        },
    ),
)
Common middleware use cases:
- Observability: Log requests, responses, and performance metrics
- Security: Add authentication or filter sensitive data
- Resilience: Use the built-in
RetryandFallback, or write your own circuit breaker - Cost Control: Track token usage and enforce limits
Migrating from V1 (
ai.WithMiddleware)Earlier versions of Genkit used
ai.WithMiddleware(...)with afunc(ai.ModelFunc) ai.ModelFuncsignature. As of v1.7.0 that API is officially marked// Deprecated:in Genkit’s source and superseded byai.WithUse. Existing code keeps compiling—the Go toolchain simply surfaces a deprecation warning. To migrate, swapWithMiddlewareforWithUseand rewrite the closure into the*ai.Hooks{WrapModel: ...}shape shown above.
Multimedia Generation
Until now, we’ve been working exclusively with text - prompts go in, text comes out. But modern AI models can process and generate various types of media, enabling new types of applications.
Beyond Text: Working with Different Media Types
Traditional LLMs handle text, but today’s models work with multimedia:
What we’ve covered so far:
- Text → Text (traditional prompt-response generation)
What multimedia generation enables:
- Image → Text: Analyze photos, diagrams, and visual content
- Audio → Text: Transcribe speech and analyze sound
- Video → Text: Process video content and extract information
- Text → Image: Generate visuals from descriptions
This allows AI to work with different media types beyond just text.
Why Multimedia Matters
Working with multimedia unlocks practical applications that weren’t possible with text alone:
- Visual Understanding: Analyze product images, medical scans, or design mockups directly
- Audio Intelligence: Transcribe meetings, analyze customer calls, or process podcasts
- Content Creation: Generate logos, illustrations, or marketing visuals on demand
- Document Processing: Extract data from PDFs, invoices, or handwritten notes
Working with Multimedia in Genkit Go
To demonstrate multimedia capabilities, we’ll use two powerful Google models:
Gemini 2.5 Flash - Multimedia Input Processing
According to the official documentation, Gemini 2.5 Flash can process: https://cloud.google.com/vertex-ai/generative-ai/docs/models/gemini/2-5-flash
- Images: Up to 3000 images in a single request
- Audio: Up to 8.4 hours of audio content
- Video: Approximately 45 minutes
Gemini 2.5 Flash Image (aka Nano Banana) - Text-to-Image Generation
Gemini 2.5 Flash Image is Google’s latest multimodal model that supports image generation through response modalities: https://ai.google.dev/gemini-api/docs/image-generation
- Input: Text
- Output: High-quality images in various aspect ratios
- Strengths: Photorealistic quality, accurate text rendering, fewer artifacts
- Use cases: Product design, marketing materials, creative content
Let’s explore how to leverage these multimedia capabilities in your Genkit applications.
From Text-Only to Multimedia Processing
Compare the familiar text-only approach with multimedia:
// What we've been doing: Text → Text
resp, err := genkit.Generate(ctx, g,
    ai.WithPrompt("Describe a red backpack"),
    ai.WithModelName("googleai/gemini-2.5-flash"))
// AI imagines what a red backpack might look like

// What multimedia enables: Image → Text
resp, err := genkit.Generate(ctx, g,
    ai.WithModelName("googleai/gemini-2.5-flash"),
    ai.WithMessages(
        ai.NewUserMessage(
            ai.NewTextPart("What's in this image?"),
            ai.NewMediaPart("", "https://example.com/actual-backpack.jpg"),
        ),
    ))
// AI sees and describes the actual backpack
The difference is that instead of the AI imagining based on text, it analyzes the actual content.
Image Understanding with Gemini
Process images using WithMessages and NewMediaPart:
// Analyze a product image
resp, err := genkit.Generate(ctx, g,
    ai.WithModelName("googleai/gemini-2.5-flash"),
    ai.WithMessages(
        ai.NewUserMessage(
            ai.NewTextPart("Describe this product in detail"),
            ai.NewMediaPart("", "https://example.com/product.jpg"),
        ),
    ))

fmt.Println(resp.Text())
// Output: "This is a professional DSLR camera with a black body and
//          silver accents. It features a large lens with focal length
//          markings, multiple control dials, and appears to be a
//          full-frame model suitable for professional photography..."
You can also ask specific questions about images:
// Visual Q&A
resp, err := genkit.Generate(ctx, g,
    ai.WithModelName("googleai/gemini-2.5-flash"),
    ai.WithMessages(
        ai.NewUserMessage(
            ai.NewTextPart("Is this food vegetarian? List any meat products you see."),
            ai.NewMediaPart("", "https://example.com/meal.jpg"),
        ),
    ))
Audio Processing with Gemini
Gemini can also process audio files for transcription and analysis:
// Transcribe audio
resp, err := genkit.Generate(ctx, g,
    ai.WithModelName("googleai/gemini-2.5-flash"),
    ai.WithMessages(
        ai.NewUserMessage(
            ai.NewTextPart("Transcribe this audio"),
            ai.NewMediaPart("", "https://example.com/podcast-clip.mp3"),
        ),
    ))

fmt.Println(resp.Text())
// Output: "Host: Welcome to today's episode. Today we're discussing
//          the impact of artificial intelligence on creative industries.
//          Guest: Thanks for having me. I think it's important to
//          understand that AI is a tool that augments creativity..."
Beyond simple transcription, you can analyze audio content:
// Audio analysis
resp, err := genkit.Generate(ctx, g,
    ai.WithModelName("googleai/gemini-2.5-flash"),
    ai.WithMessages(
        ai.NewUserMessage(
            ai.NewTextPart("Identify the speakers and summarize the main points discussed"),
            ai.NewMediaPart("", "https://example.com/meeting.mp3"),
        ),
    ))
Image Generation with Gemini 2.5 Flash Image (aka Nano Banana)
Generate images from text descriptions using Gemini’s image generation capabilities:
// Generate an image
resp, err := genkit.Generate(ctx, g,
    ai.WithModelName("googleai/gemini-2.5-flash-image-preview"),
    ai.WithPrompt("A minimalist logo for a coffee shop called 'Morning Brew', incorporating a coffee cup and sunrise elements, modern flat design style"),
    ai.WithConfig(&genai.GenerateContentConfig{
        ResponseModalities: []string{"IMAGE"},
    }))

// The image is returned as a base64-encoded data URI in the response
for _, part := range resp.Message.Content {
    if part.IsMedia() {
        imageData := part.Text // Contains data:image/png;base64,...
        // You can use this directly in HTML or decode for file storage
        fmt.Printf("Generated image (data URI): %s...
", imageData[:50])
        break
    }
}
Key configuration options:
| Option | Description | Values |
|---|---|---|
AspectRatio |
Image dimensions | "1:1", "3:4", "4:3", "9:16", "16:9" |
NumberOfImages |
Variations to generate | 1-8 (default: 4) |
NegativePrompt |
What to avoid | e.g., "blurry, low quality" |
PersonGeneration |
Allow people in images | AllowAll, AllowAdult, DontAllow |
SafetyFilterLevel |
Content filtering | BlockLowAndAbove, BlockMediumAndAbove, BlockOnlyHigh |
OutputMIMEType |
Output format | "image/png", "image/jpeg" |
Combining Modalities in Workflows
You can chain multimedia operations:
// Example: Image analysis followed by creative expansion
func analyzeAndExpand(ctx context.Context, g *genkit.Generator, imageURL string) (string, error) {
    // Step 1: Analyze the original image
    analysis, err := genkit.Generate(ctx, g,
        ai.WithModelName("googleai/gemini-2.5-flash"),
        ai.WithMessages(
            ai.NewUserMessage(
                ai.NewTextPart("Describe this image's style, colors, and mood"),
                ai.NewMediaPart("", imageURL),
            ),
        ))
    if err != nil {
        return "", err
    }

    // Step 2: Generate a creative variation
    variation, err := genkit.Generate(ctx, g,
        ai.WithModelName("googleai/gemini-2.5-flash-image-preview"),
        ai.WithPrompt(fmt.Sprintf(
            "Create an artistic interpretation: %s, but in a surrealist style",
            analysis.Text(),
        )),
        ai.WithConfig(&genai.GenerateContentConfig{
            ResponseModalities: []string{"IMAGE"},
        }))
    if err != nil {
        return "", err
    }

    return variation.Media(), nil
}
Moving Beyond Simple I/O
While this section demonstrates basic multimedia processing, real applications often need more:
- Structured extraction from images: Product details, receipt data, form information
- Structured audio analysis: Meeting minutes with action items, speaker identification
- Generated images with metadata: Creation parameters, style attributes, variations
These advanced patterns - combining multimedia inputs with structured outputs - are covered extensively in Chapter 5, where you’ll learn to build production-ready applications that extract structured, type-safe data from various media types.
Error Handling: Building Resilient AI Applications
AI services can fail in various ways - from rate limits to model unavailability to unexpected output formats. Genkit provides structured error types to handle these scenarios:
| Status | When It Occurs | Recovery Strategy |
|---|---|---|
INVALID_ARGUMENT |
Bad prompt format, invalid parameters | Validate input, provide user guidance |
NOT_FOUND |
Model or resource doesn’t exist | Use fallback model or default behavior |
RESOURCE_EXHAUSTED |
Rate limits, quota exceeded | Implement exponential backoff |
DEADLINE_EXCEEDED |
Request timeout | Retry with simpler prompt or smaller model |
PERMISSION_DENIED |
API key issues, access denied | Check credentials, alert user |
INTERNAL |
Server-side errors | Alert operations, fail gracefully |
UNAVAILABLE |
Service temporarily down | Circuit breaker pattern |
Here’s how to handle these errors in practice:
resp, err := genkit.Generate(ctx, g, ai.WithPrompt(prompt))
if err != nil {
    var coreErr *core.GenkitError
    if errors.As(err, &coreErr) {
        switch coreErr.Status {
        case core.INVALID_ARGUMENT:
            // Bad input - ask user to clarify
        case core.NOT_FOUND:
            // Model not found - use fallback
        case core.RESOURCE_EXHAUSTED:
            // Rate limited - retry with backoff
        case core.DEADLINE_EXCEEDED:
            // Timeout - try simpler approach
        case core.UNAVAILABLE, core.INTERNAL:
            // Service issues - alert and fail
        default:
            // Unknown error
        }
    }
}
This structured approach helps manage AI failures, allowing your application to handle errors appropriately.
Dotprompt: Professional Prompt Management
As your AI application grows, managing prompts in code becomes unwieldy. Dotprompt brings software engineering best practices to prompt management, treating prompts as code that can be versioned, tested, and optimized independently from your application logic. https://github.com/google/dotprompt
Core Concepts
Dotprompt is built on the premise that prompts are code. It provides:
- File-based organization with
.promptfiles - YAML frontmatter for configuration
- Handlebars templating for dynamic content
- Schema validation for inputs and outputs
Getting Started
Create a simple prompt file:
# prompts/recipe_generator.prompt
---
model: googleai/gemini-2.5-flash
input:
  schema:
    cuisine: string
    servings: integer
output:
  schema:
    name: string
    ingredients(array): string
    steps(array): string
---

Generate a {{cuisine}} recipe for {{servings}} people.
Use it in your code:
// Initialize with prompt directory
g := genkit.Init(ctx,
    genkit.WithPromptDir("prompts"),
    genkit.WithPlugins(&googlegenai.GoogleAI{}))

// Load and execute
recipePrompt := genkit.LookupPrompt(g, "recipe_generator")
resp, err := recipePrompt.Execute(ctx,
    ai.WithInput(map[string]any{
        "cuisine": "Italian",
        "servings": 4,
    }))
Advanced Features
Multi-Message Prompts
Use {{role}} for conversations:
---
model: googleai/gemini-2.5-flash
input:
  schema:
    topic: string
---
{{role "system"}}
You are a helpful cooking instructor.

{{role "user"}}
Explain {{topic}} in simple terms.
Multi-Modal Support
Handle images with {{media}}:
---
model: googleai/gemini-2.5-flash
input:
  schema:
    imageUrl: string
---
{{role "user"}}
What dish is shown in this image?
{{media url=imageUrl}}
Partials for Reusability
Create reusable components:
# prompts/_base_personality.prompt
You are a helpful assistant specialized in {{domain}}.
Always be concise and accurate.
Use in other prompts:
---
model: googleai/gemini-2.5-flash
---
{{role "system"}}
{{>base_personality domain="cooking"}}

{{role "user"}}
{{question}}
Custom Helpers
Register helpers for custom logic:
genkit.DefineHelper(g, "shout", func(input string) string {
    return strings.ToUpper(input)
})
Use in prompts:
---
model: googleai/gemini-2.5-flash
input:
  schema:
    name: string
---

HELLO, {{shout name}}!!!
Prompt Variants
Test different versions:
prompts/
├── analyzer.prompt          # Baseline
├── analyzer.detailed.prompt # Variant A
└── analyzer.concise.prompt  # Variant B
Load dynamically:
variant := "detailed" // from A/B test
prompt := genkit.LookupPrompt(g, "analyzer." + variant)
Note: For production A/B testing, you can integrate with Firebase Remote Config or Firestore to dynamically control variant selection and enable gradual rollouts.
Running the Example
To run the Chapter 4 example and explore generation patterns:
1. Set up environment
export GEMINI_API_KEY="your-api-key"
2. Run the application
cd src/examples/chapter-04
go run main.go
3. Test with curl
Test basic generation:
curl -X POST http://localhost:9090/basicGenerationFlow \
  -H "Content-Type: application/json" \
  -d '{"data": "how to cook perfect rice"}'
Example response (abbreviated):
{
  "result": "Hello there, aspiring chef! Today, we're going to master the art of perfect rice...\n\n### How to Cook Perfect Fluffy White Rice (Stovetop Method)\n\n#### What You'll Need:\n- **Rice:** 1 cup\n- **Water:** 2 cups (magic ratio: 1:2)\n- **Salt:** 1/2 teaspoon\n\n#### Simple Steps:\n1. **Rinse the rice** until water runs clear\n2. **Combine** rice, water, and salt in a pot\n3. **Bring to a boil** on medium-high heat\n4. **Reduce heat & cover** - simmer for 18 minutes (DO NOT LIFT THE LID!)\n5. **Rest** for 10 minutes off heat\n6. **Fluff with a fork** and serve!\n\n[Full response truncated for brevity...]"
}
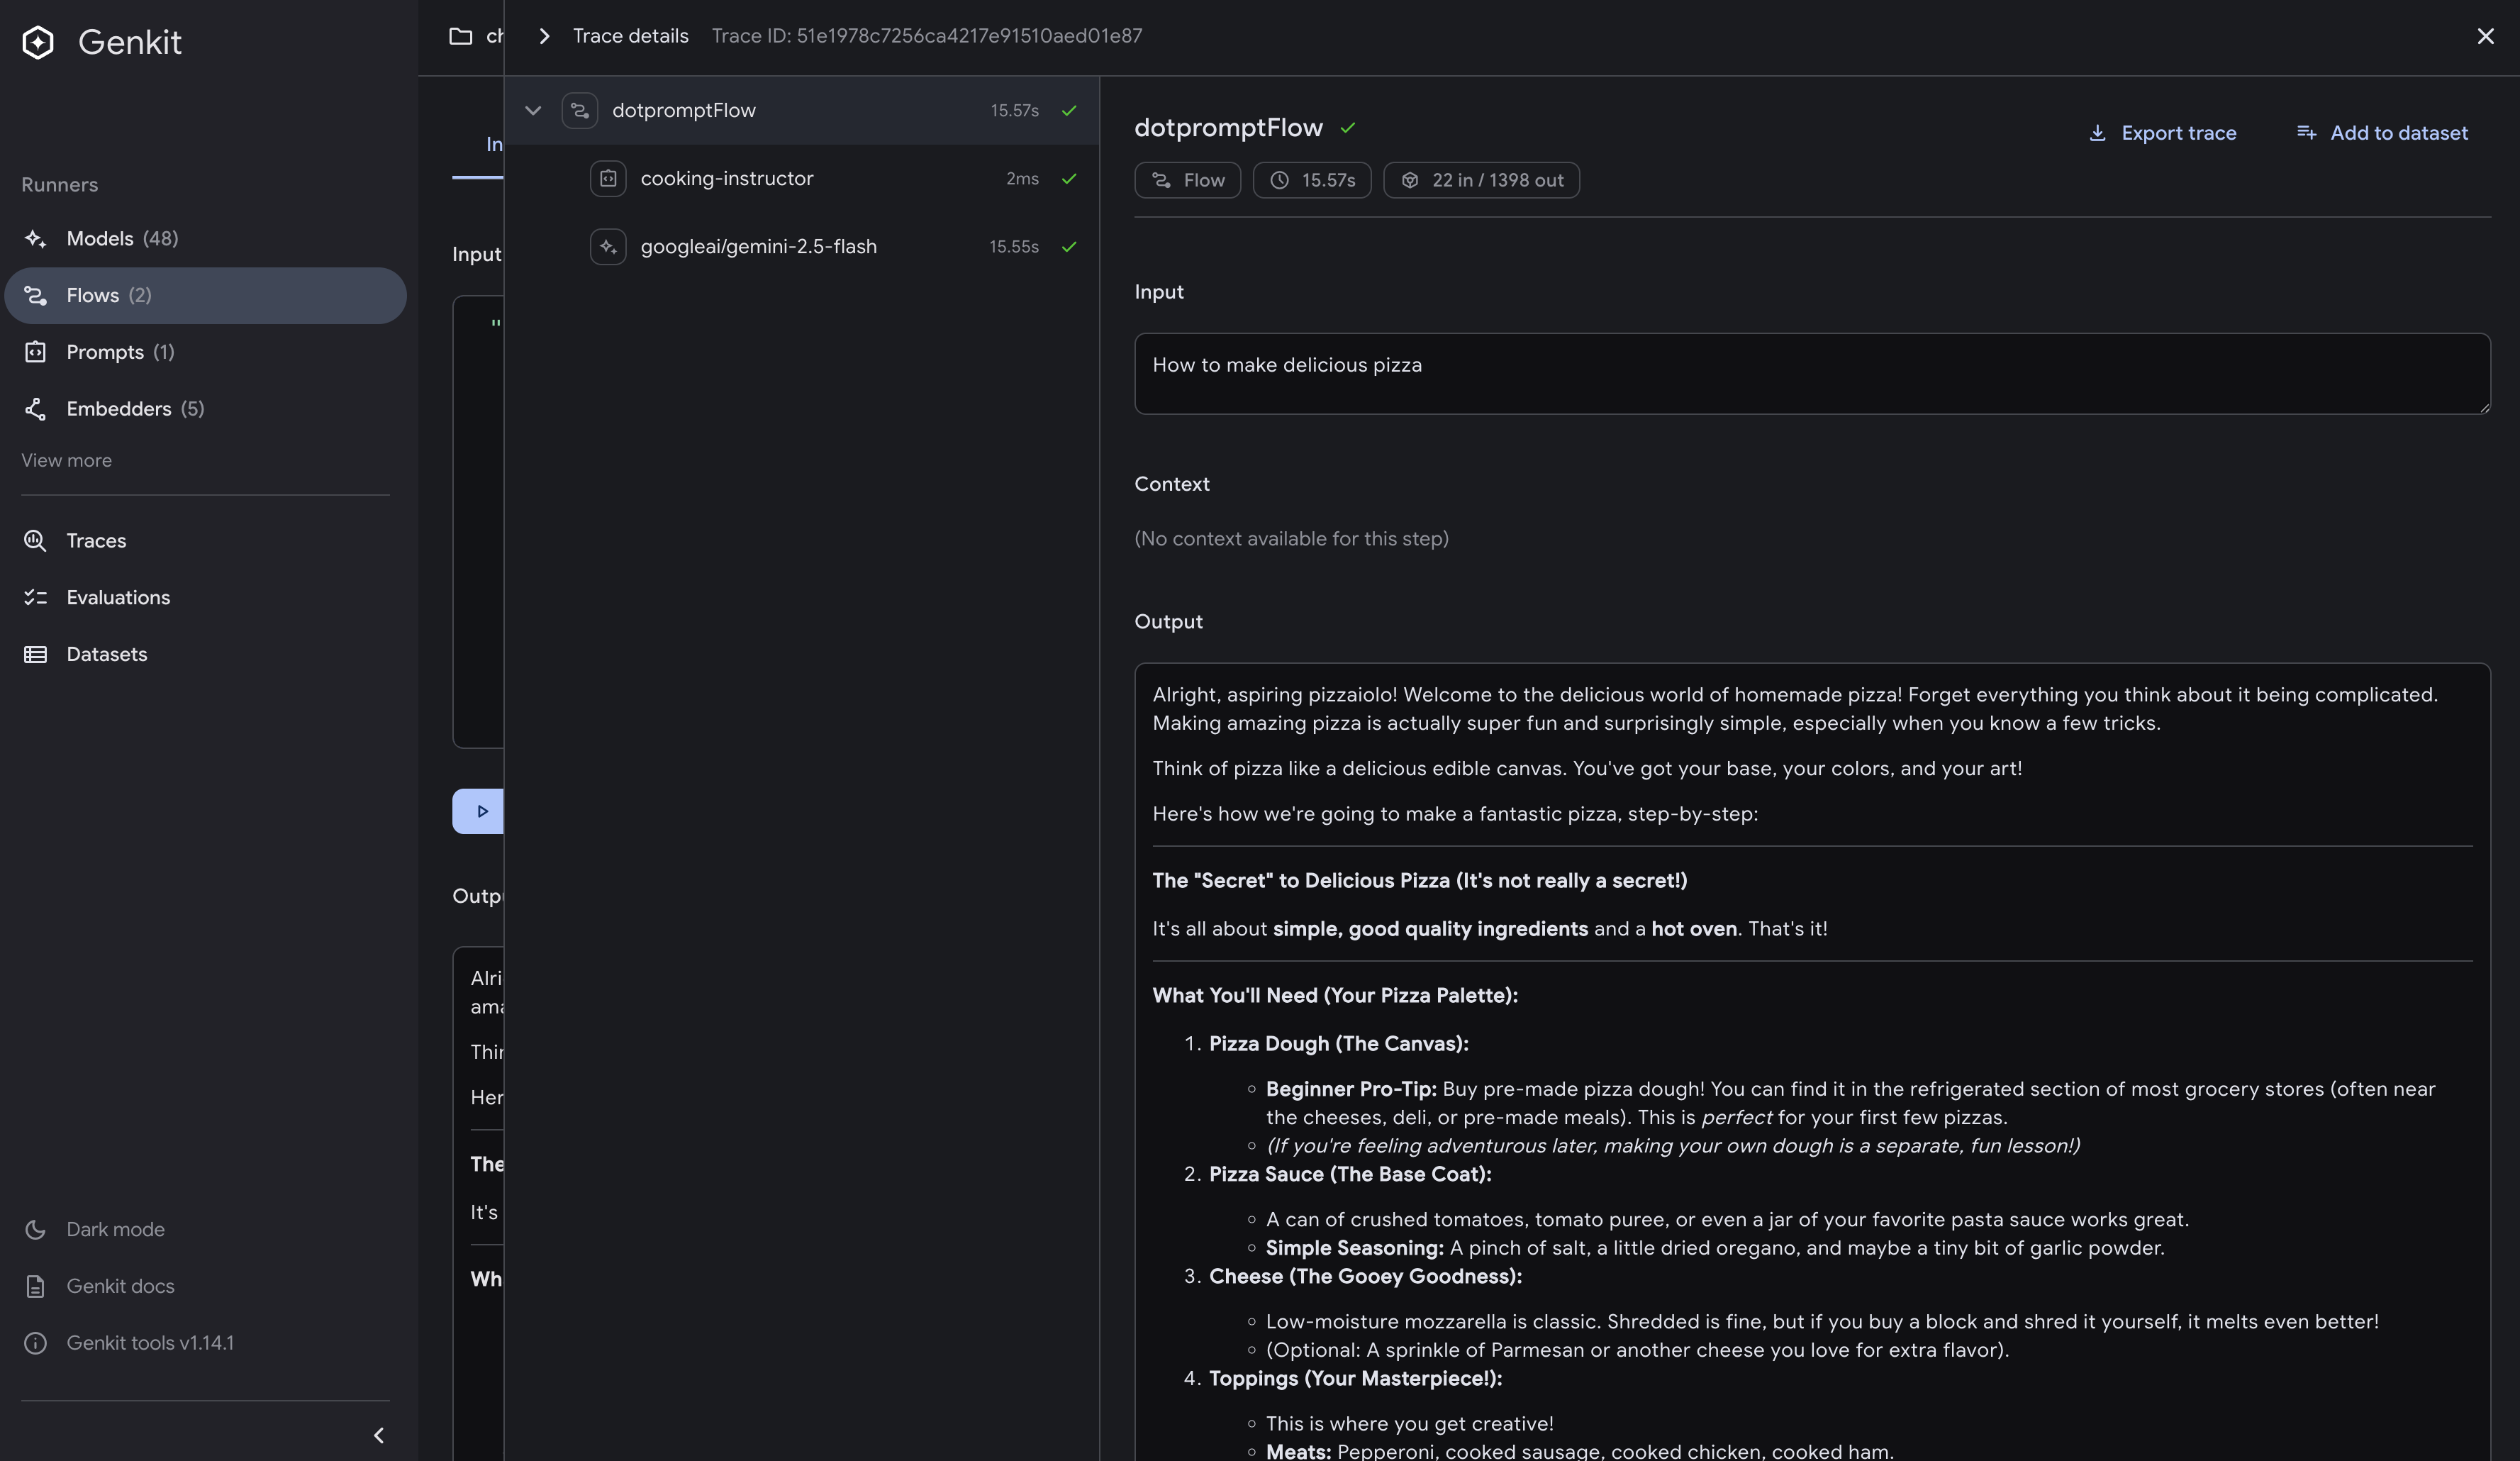
Test Dotprompt flow:
curl -X POST http://localhost:9090/dotpromptFlow \
  -H "Content-Type: application/json" \
  -d '{"data": "making pasta from scratch"}'
Example response (abbreviated):
{
  "result": "Alright, my aspiring chefs! Ready to unlock a super satisfying kitchen secret?...\n\n### Basic Recipe (2 servings):\n- **1 cup all-purpose flour**\n- **1 large egg**\n- **Pinch of salt**\n\n### Quick Steps:\n1. **Make a flour volcano** with a well in the center\n2. **Add egg** to the well and whisk\n3. **Knead** for 8-10 minutes until smooth\n4. **Rest** wrapped for 30 minutes\n5. **Roll thin** (you should almost see through it!)\n6. **Cut** into your desired shape\n7. **Cook** in boiling salted water for 2-4 minutes\n\n[Full response truncated for brevity...]"
}
Notice in the server logs how the middleware reports the dollar cost of each model call:
2026/05/08 17:31:23 Cost: $0.000395 (in: $0.000002, out: $0.000393, latency: 15762ms)
This demonstrates that our cost tracker is successfully intercepting each request, computing the dollar cost from the token usage and provider rates, and logging the results alongside the latency that Genkit measures automatically. The input cost prints as $0.000002 rather than zero because the prompt is short—around 25 tokens at $0.075 per million tokens works out to roughly two-millionths of a dollar—so the six-decimal format keeps the breakdown legible even when the absolute amounts are tiny.
4. Test with Developer UI
Start the application with the Developer UI:
genkit start -- go run .
Navigate to http://localhost:4000/flows and you’ll see the Flows section:
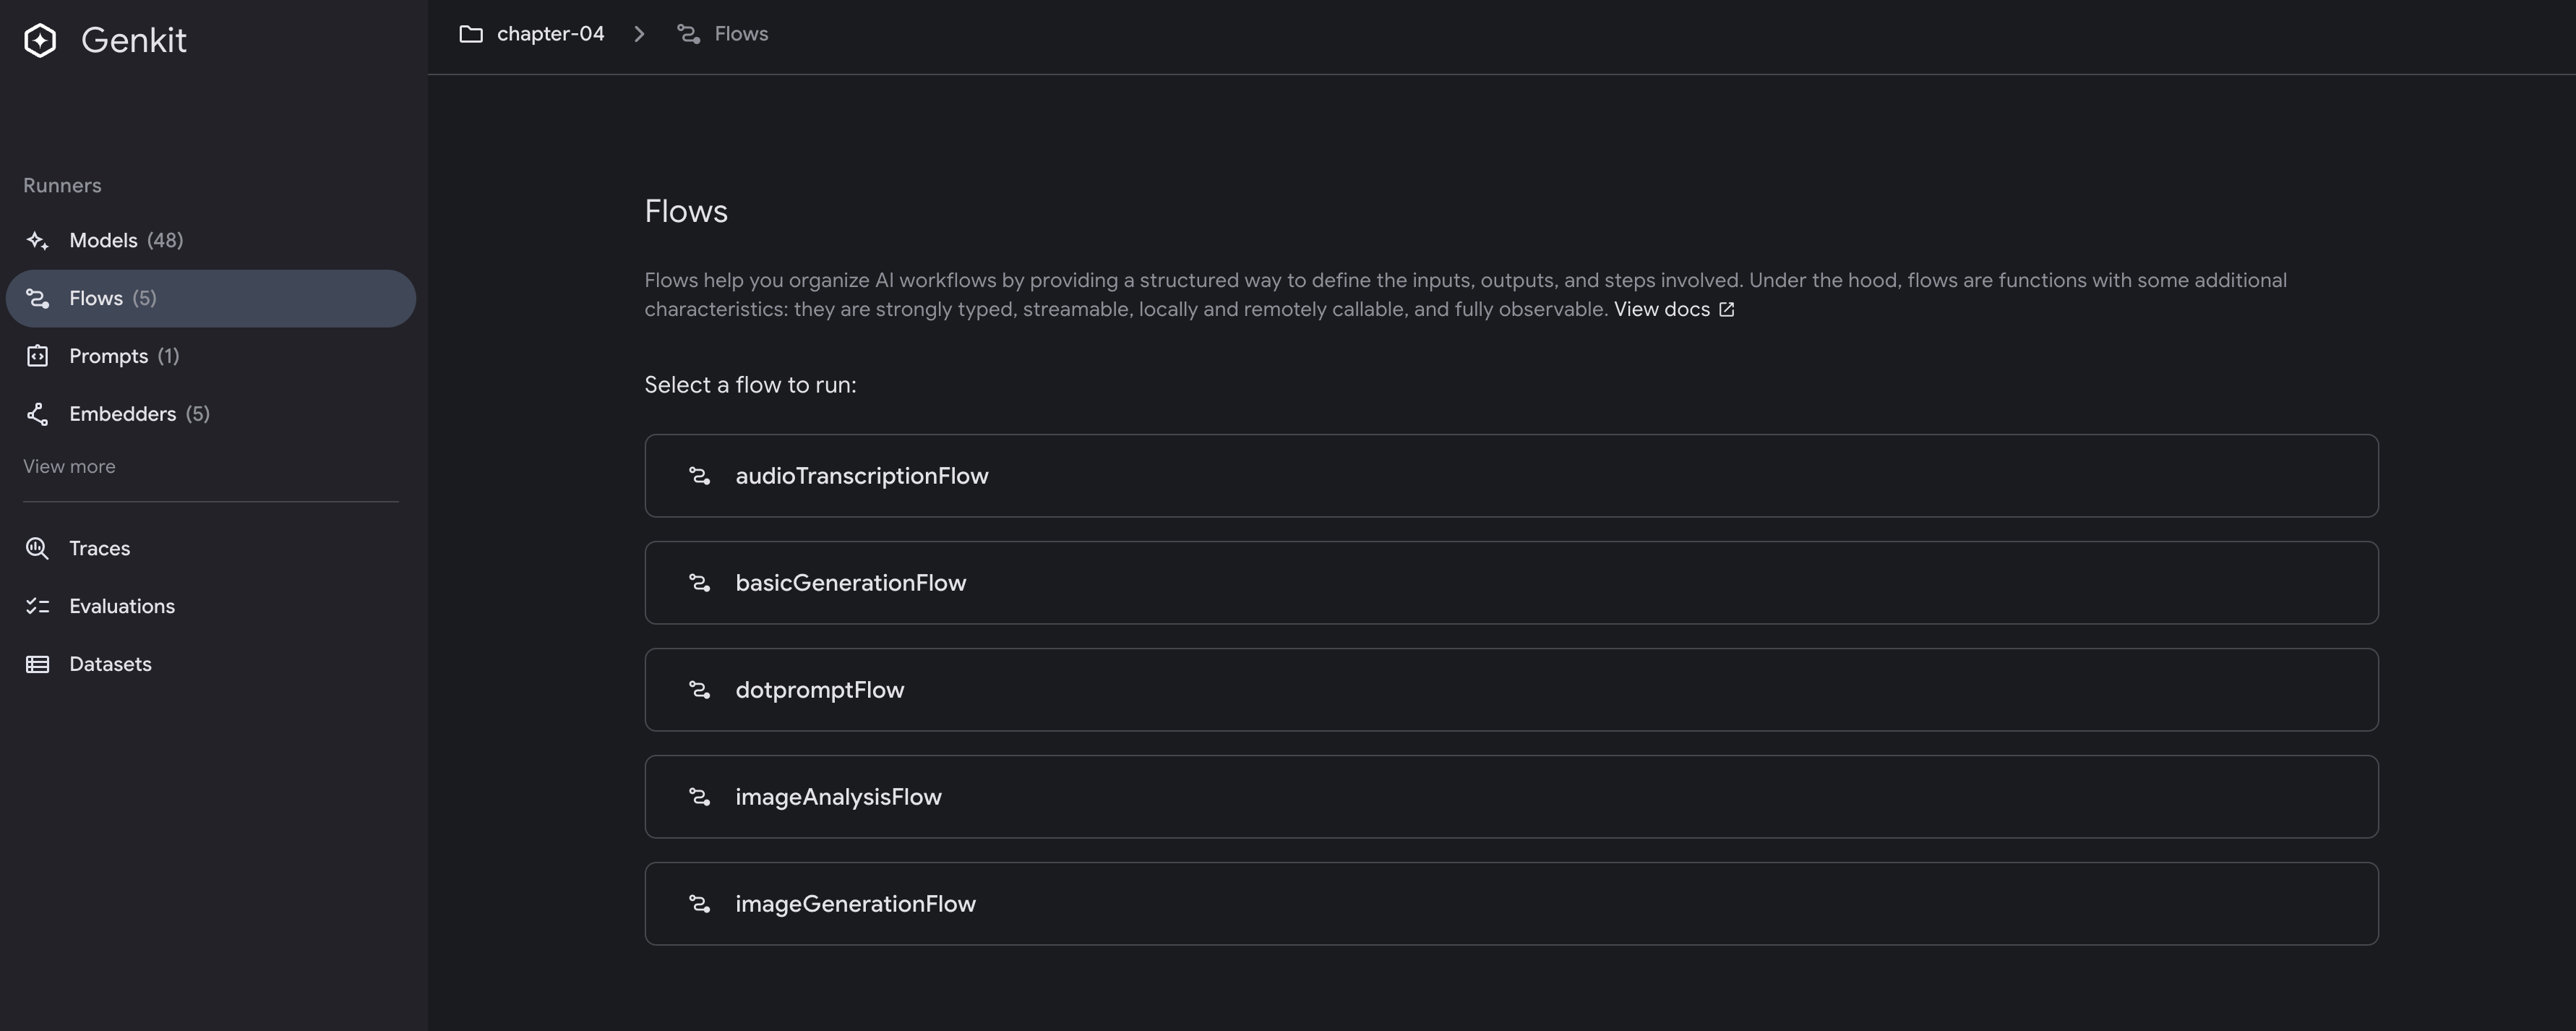
Testing Generation Patterns
The Developer UI allows you to:
- Test different flows - Compare outputs between all five flows:
basicGenerationFlow- Standard text generationdotpromptFlow- Template-based generationimageAnalysisFlow- Image analysis from URLsaudioTranscriptionFlow- Audio transcription from URLsimageGenerationFlow- Text-to-image generation
- Experiment with parameters - Adjust temperature, max tokens, and other settings
- View token usage - Understand the cost implications of your prompts
Testing Multimedia Flows
The Developer UI makes it easy to test multimedia flows:
- Image Analysis: Enter an image URL to get AI-generated descriptions
- Audio Transcription: Provide audio file URLs for automatic transcription
- Image Generation: Type text descriptions to generate images
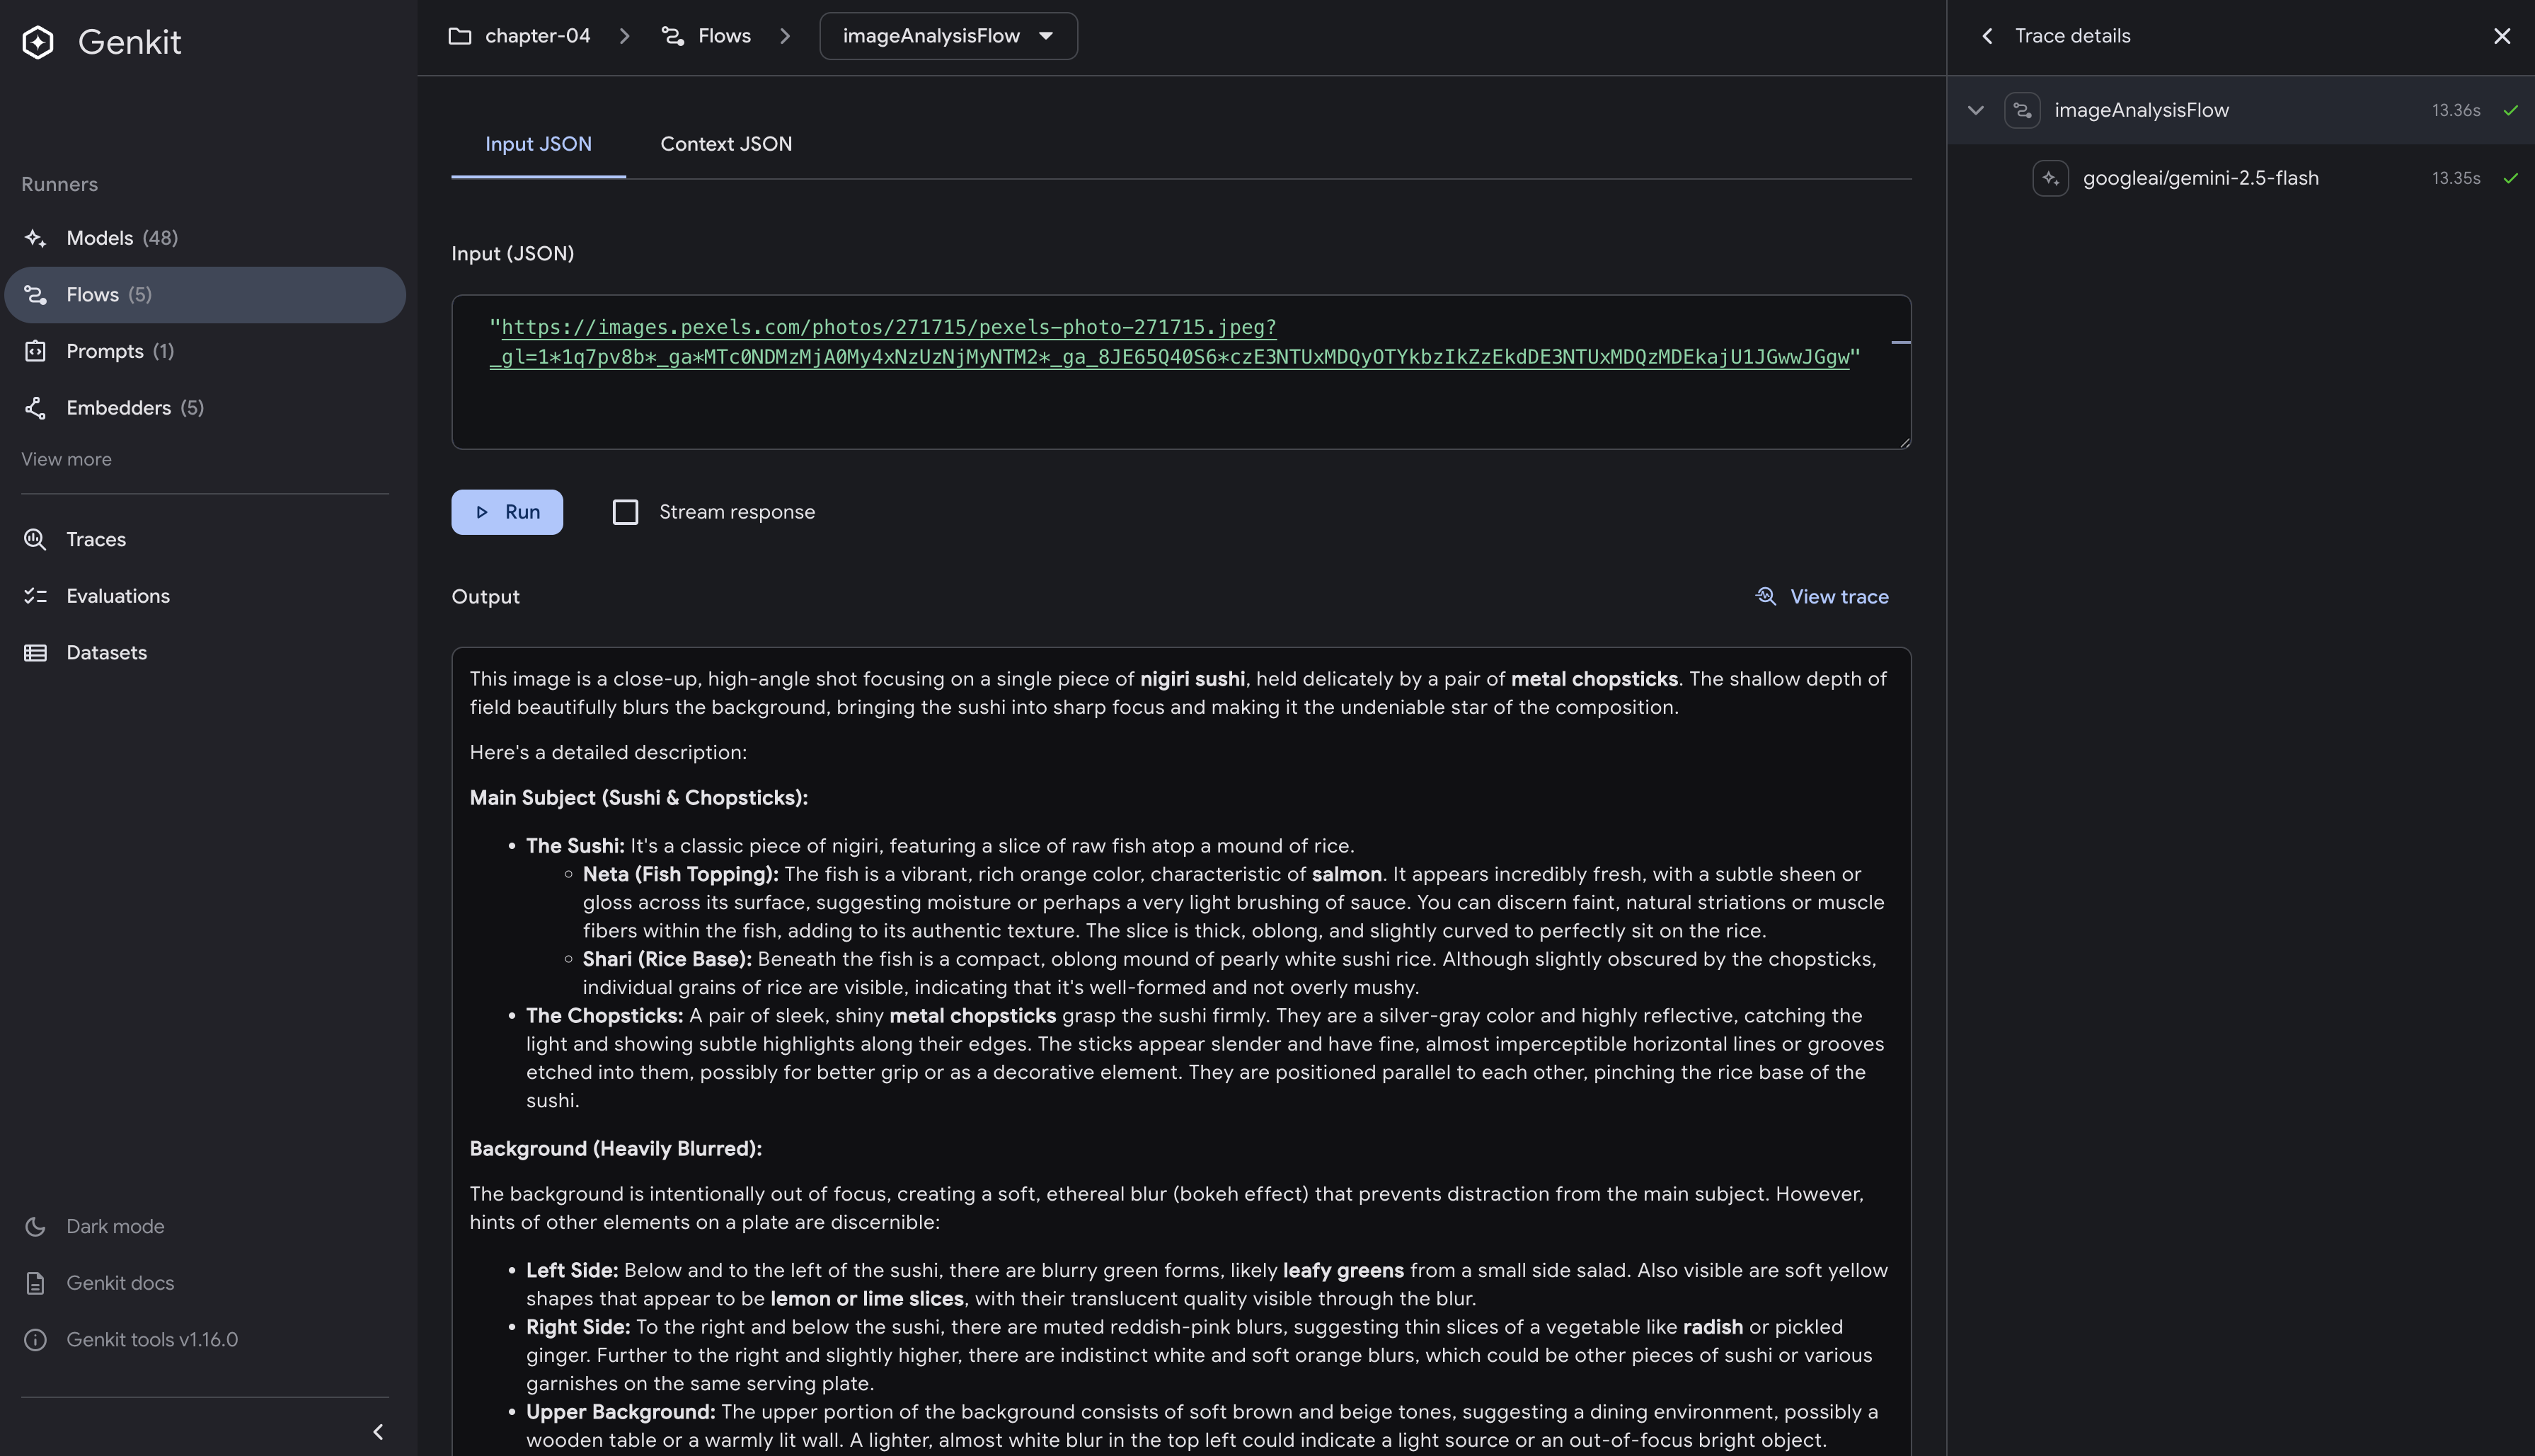
For example, testing the imageAnalysisFlow:
- Input:
"https://example.com/food-photo.jpg" - Output: Detailed description of the dish, ingredients, and presentation
Testing the audioTranscriptionFlow`:
- Input:
"https://example.com/podcast-clip.mp3" - Output: Full transcription of the audio content
![]()
The imageGenerationFlow uses Google’s Gemini 2.5 Flash Image (aka Nano Banana) model to generate images from text descriptions. The flow returns base64-encoded image data that the Developer UI automatically renders.
Testing the flow:
- Input:
"Genkit development engineer" - Output: Visual preview of the generated image

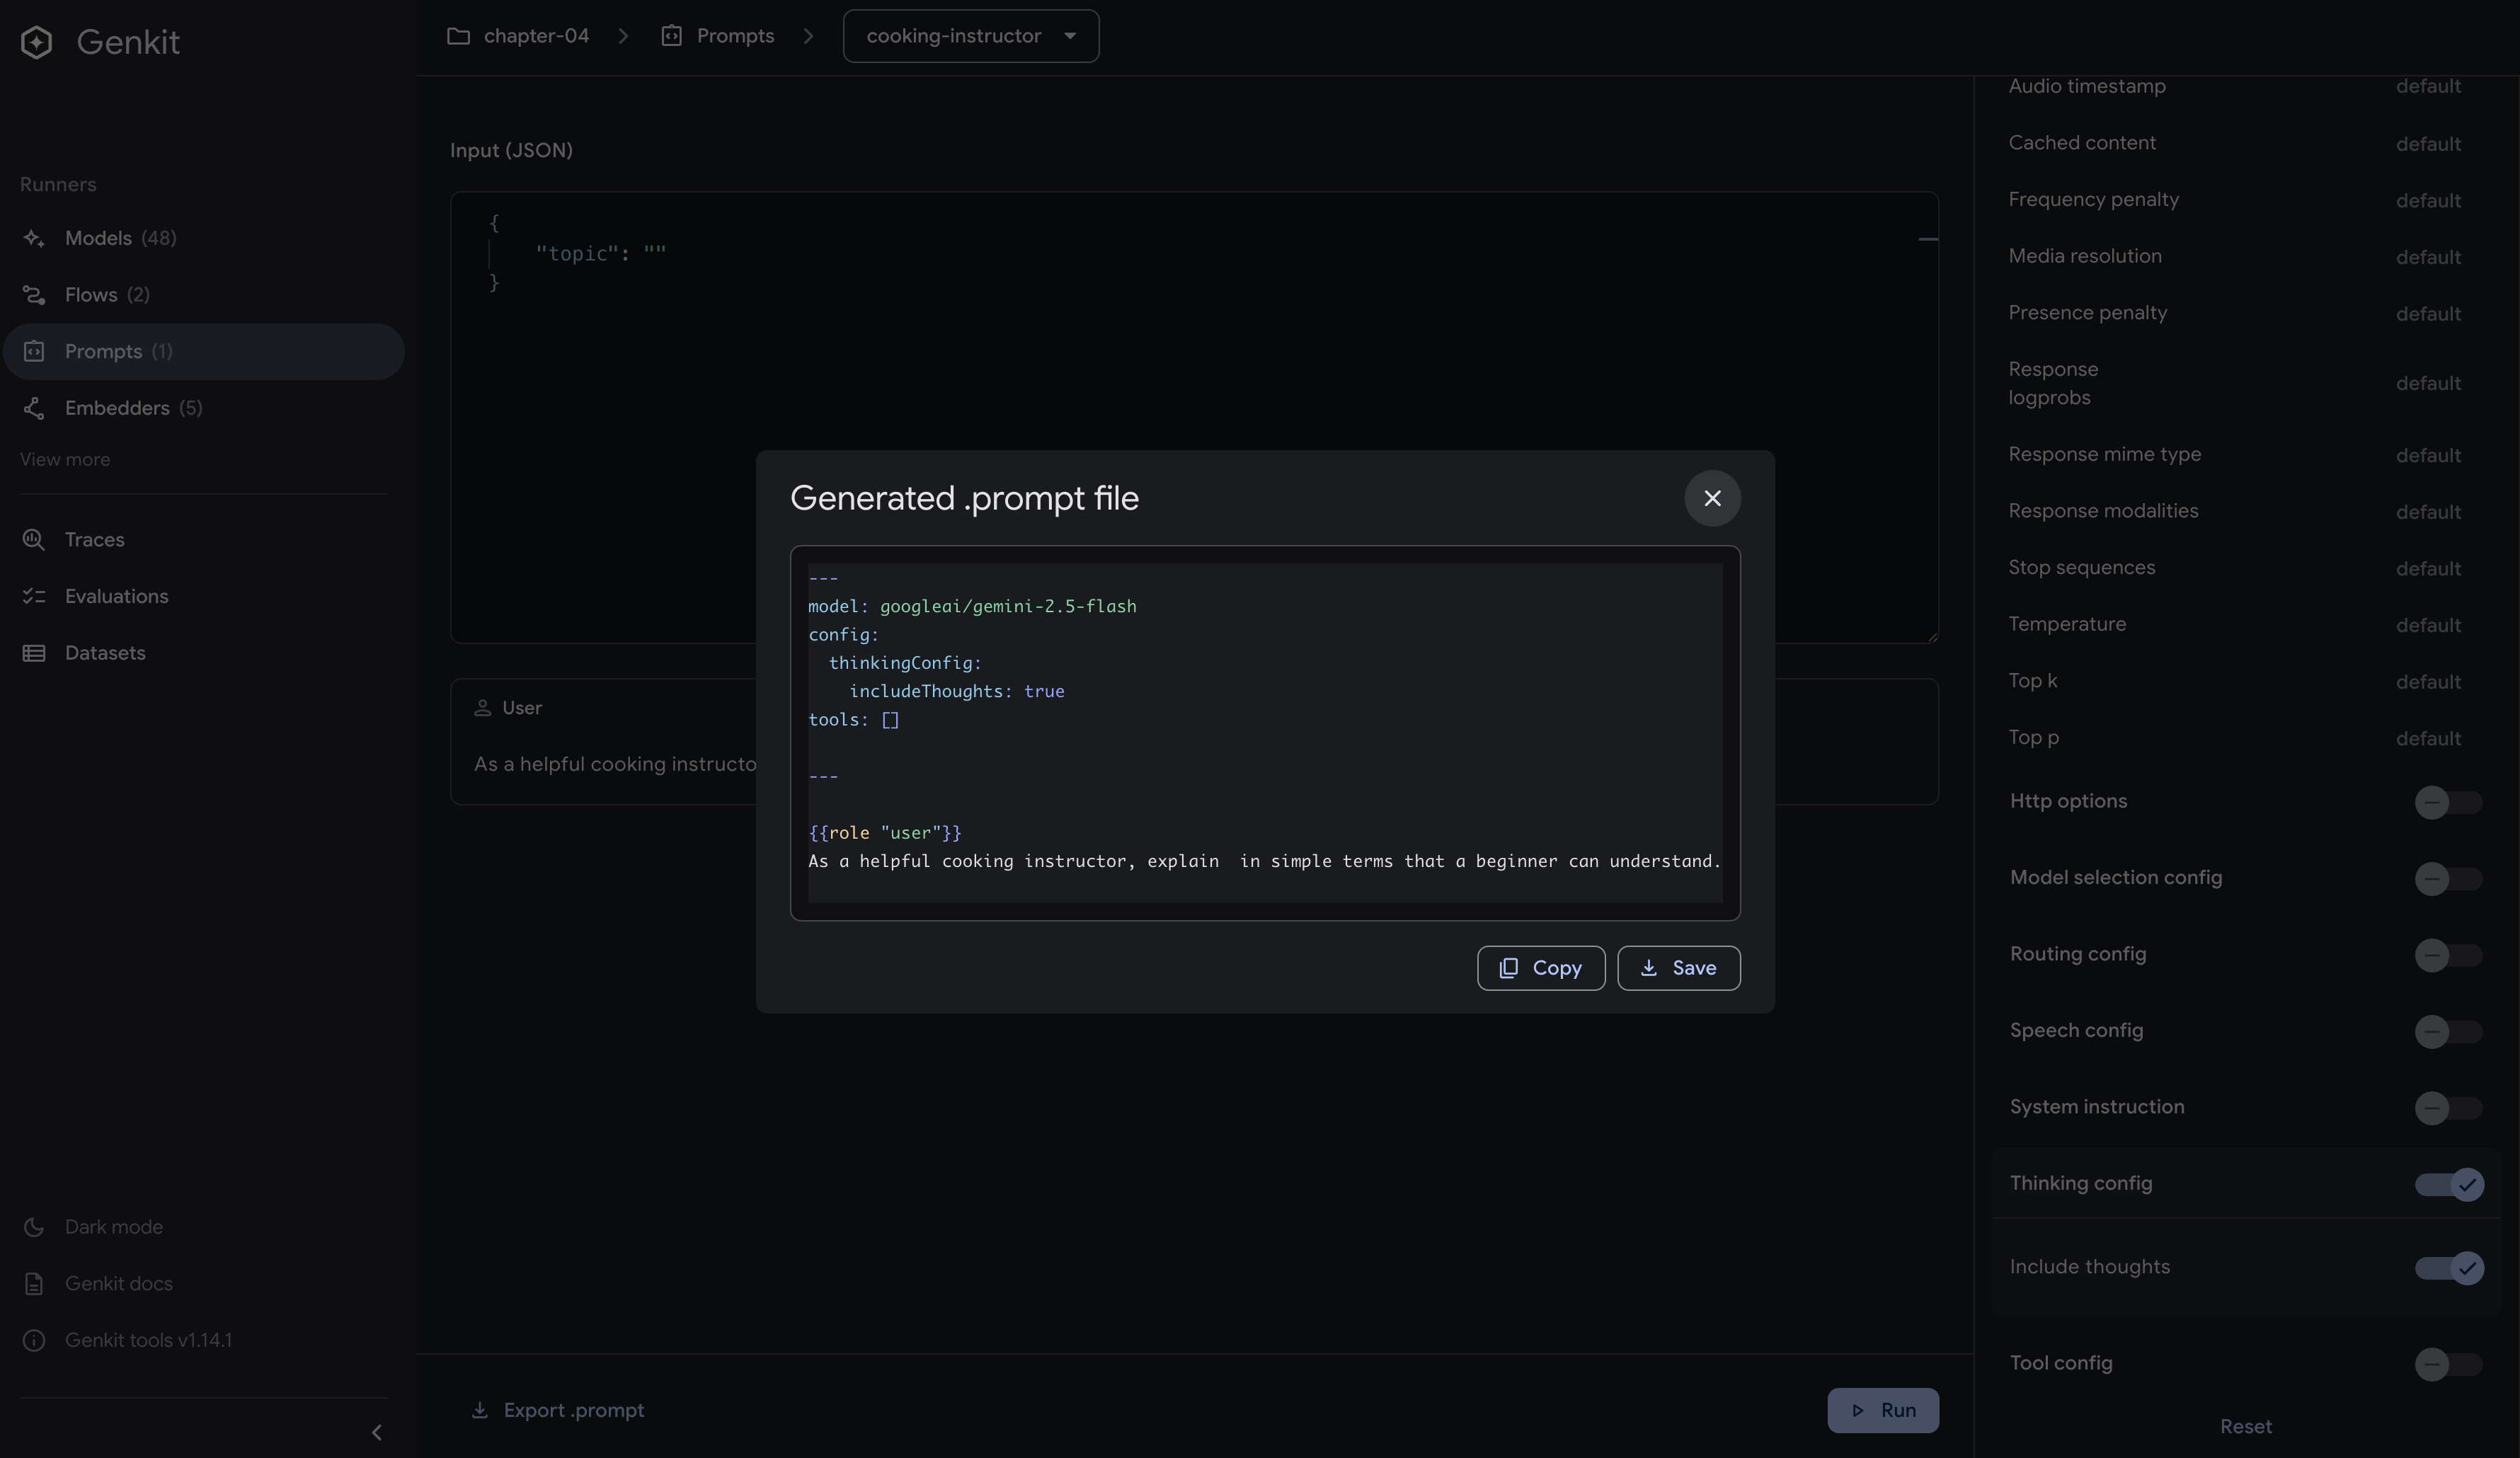
Working with Dotprompt Files
The UI automatically discovers all .prompt files in your configured directory.
Navigate to http://localhost:4000/prompts and you’ll see the Prompts section:
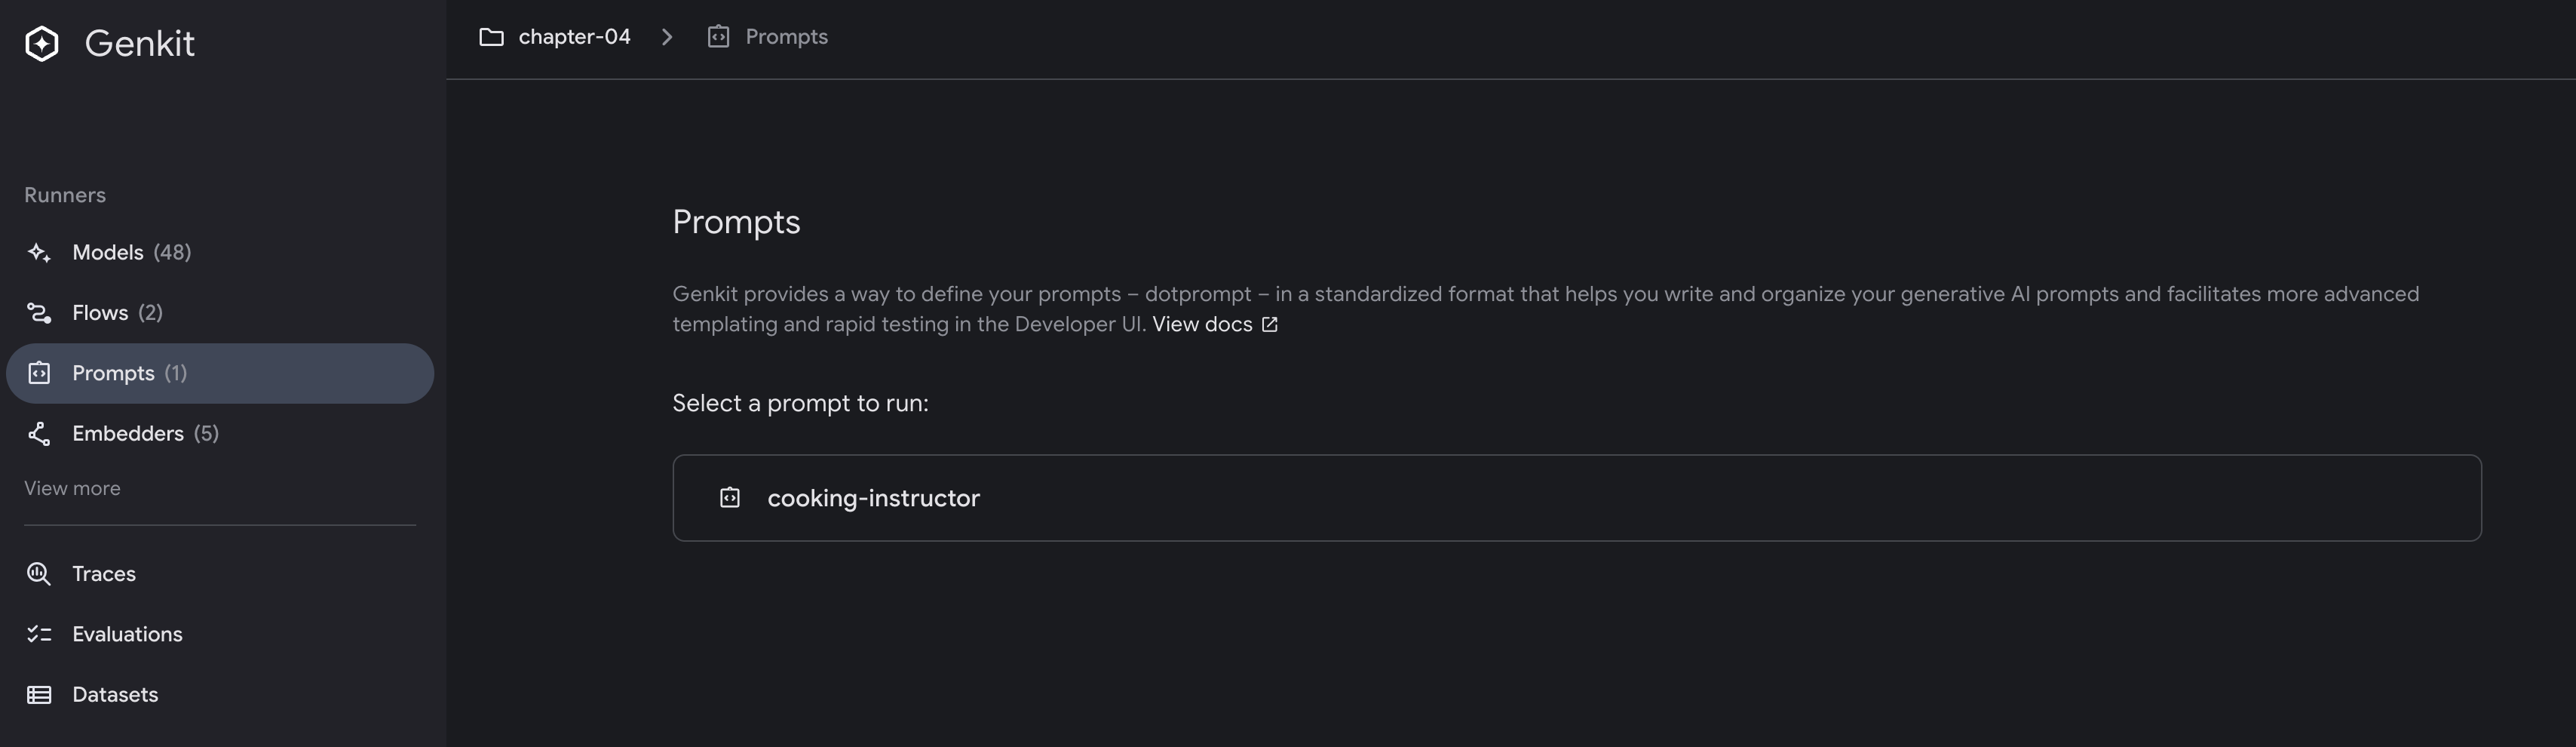
- Live editing - Modify prompts and see results immediately
- Schema validation - The UI validates your input against defined schemas
- Export successful configurations - Once you find the perfect prompt settings, export them directly
5. Test with Genkit CLI
The Genkit CLI requires your application to be running. Make sure you have started the server with
genkit start -- go run .in a separate terminal before running these commands.
# Basic generation flow
genkit flow:run basicGenerationFlow '"how to make sushi"'

# Dotprompt flow
genkit flow:run dotpromptFlow '"fermentation techniques"'
Beyond Simple Generation
This chapter covered the practical aspects of AI generation with Genkit Go, from basic text generation to multimedia processing and Dotprompt management.
The middleware pattern demonstrated with our cost tracker shows how to add cross-cutting concerns without modifying core logic. The same pattern works for authentication, authorization, rate limiting, custom logging, and retry logic. Provider switching is straightforward, allowing you to change models based on your requirements.
The Developer UI provides a visual workflow for prompt development with observability. You can test prompt variations locally, track metrics, export configurations, and maintain consistency across your team.
Key Takeaways
- The
Generatefunction provides flexible text generation with full response metadata - Middleware enables cross-cutting concerns like logging, auth, and monitoring
- Provider switching is as simple as changing a model name string
- Dotprompt brings engineering discipline to prompt management
What’s Next
This chapter introduced the fundamentals of AI generation with Genkit Go, focusing on text generation, provider independence, middleware patterns, and professional prompt management with Dotprompt. In the next chapter, we’ll explore structured output in depth with GenerateData, covering type-safe generation, complex schemas, validation strategies, and techniques for reliable data extraction. You’ll build on the patterns learned here to create more sophisticated AI applications that can handle real-world complexity with structured, type-safe outputs.