Client Integration
Introduction
Building an AI-powered backend is only half the story. The real value comes when your Genkit Go server connects with client applications across different platforms. This chapter explores the art and science of integrating a Genkit Go API server with three popular client frameworks: Flutter for mobile, Angular for web, and Next.js for modern web applications.
In today’s multi-platform world, users expect consistent experiences whether they’re on their phone, tablet, or desktop. They want real-time streaming responses, beautiful interfaces, and reliable performance. Through this chapter, you’ll learn how to deliver these experiences by building a complete cooking game application that works across all platforms.
You’ll discover how different client architectures handle the same backend API, compare streaming implementations across platforms, and understand the nuances of mobile versus web development. Most importantly, you’ll gain practical insights into building production-ready applications that use Genkit’s AI capabilities while providing enjoyable user experiences.
What You’ll Build
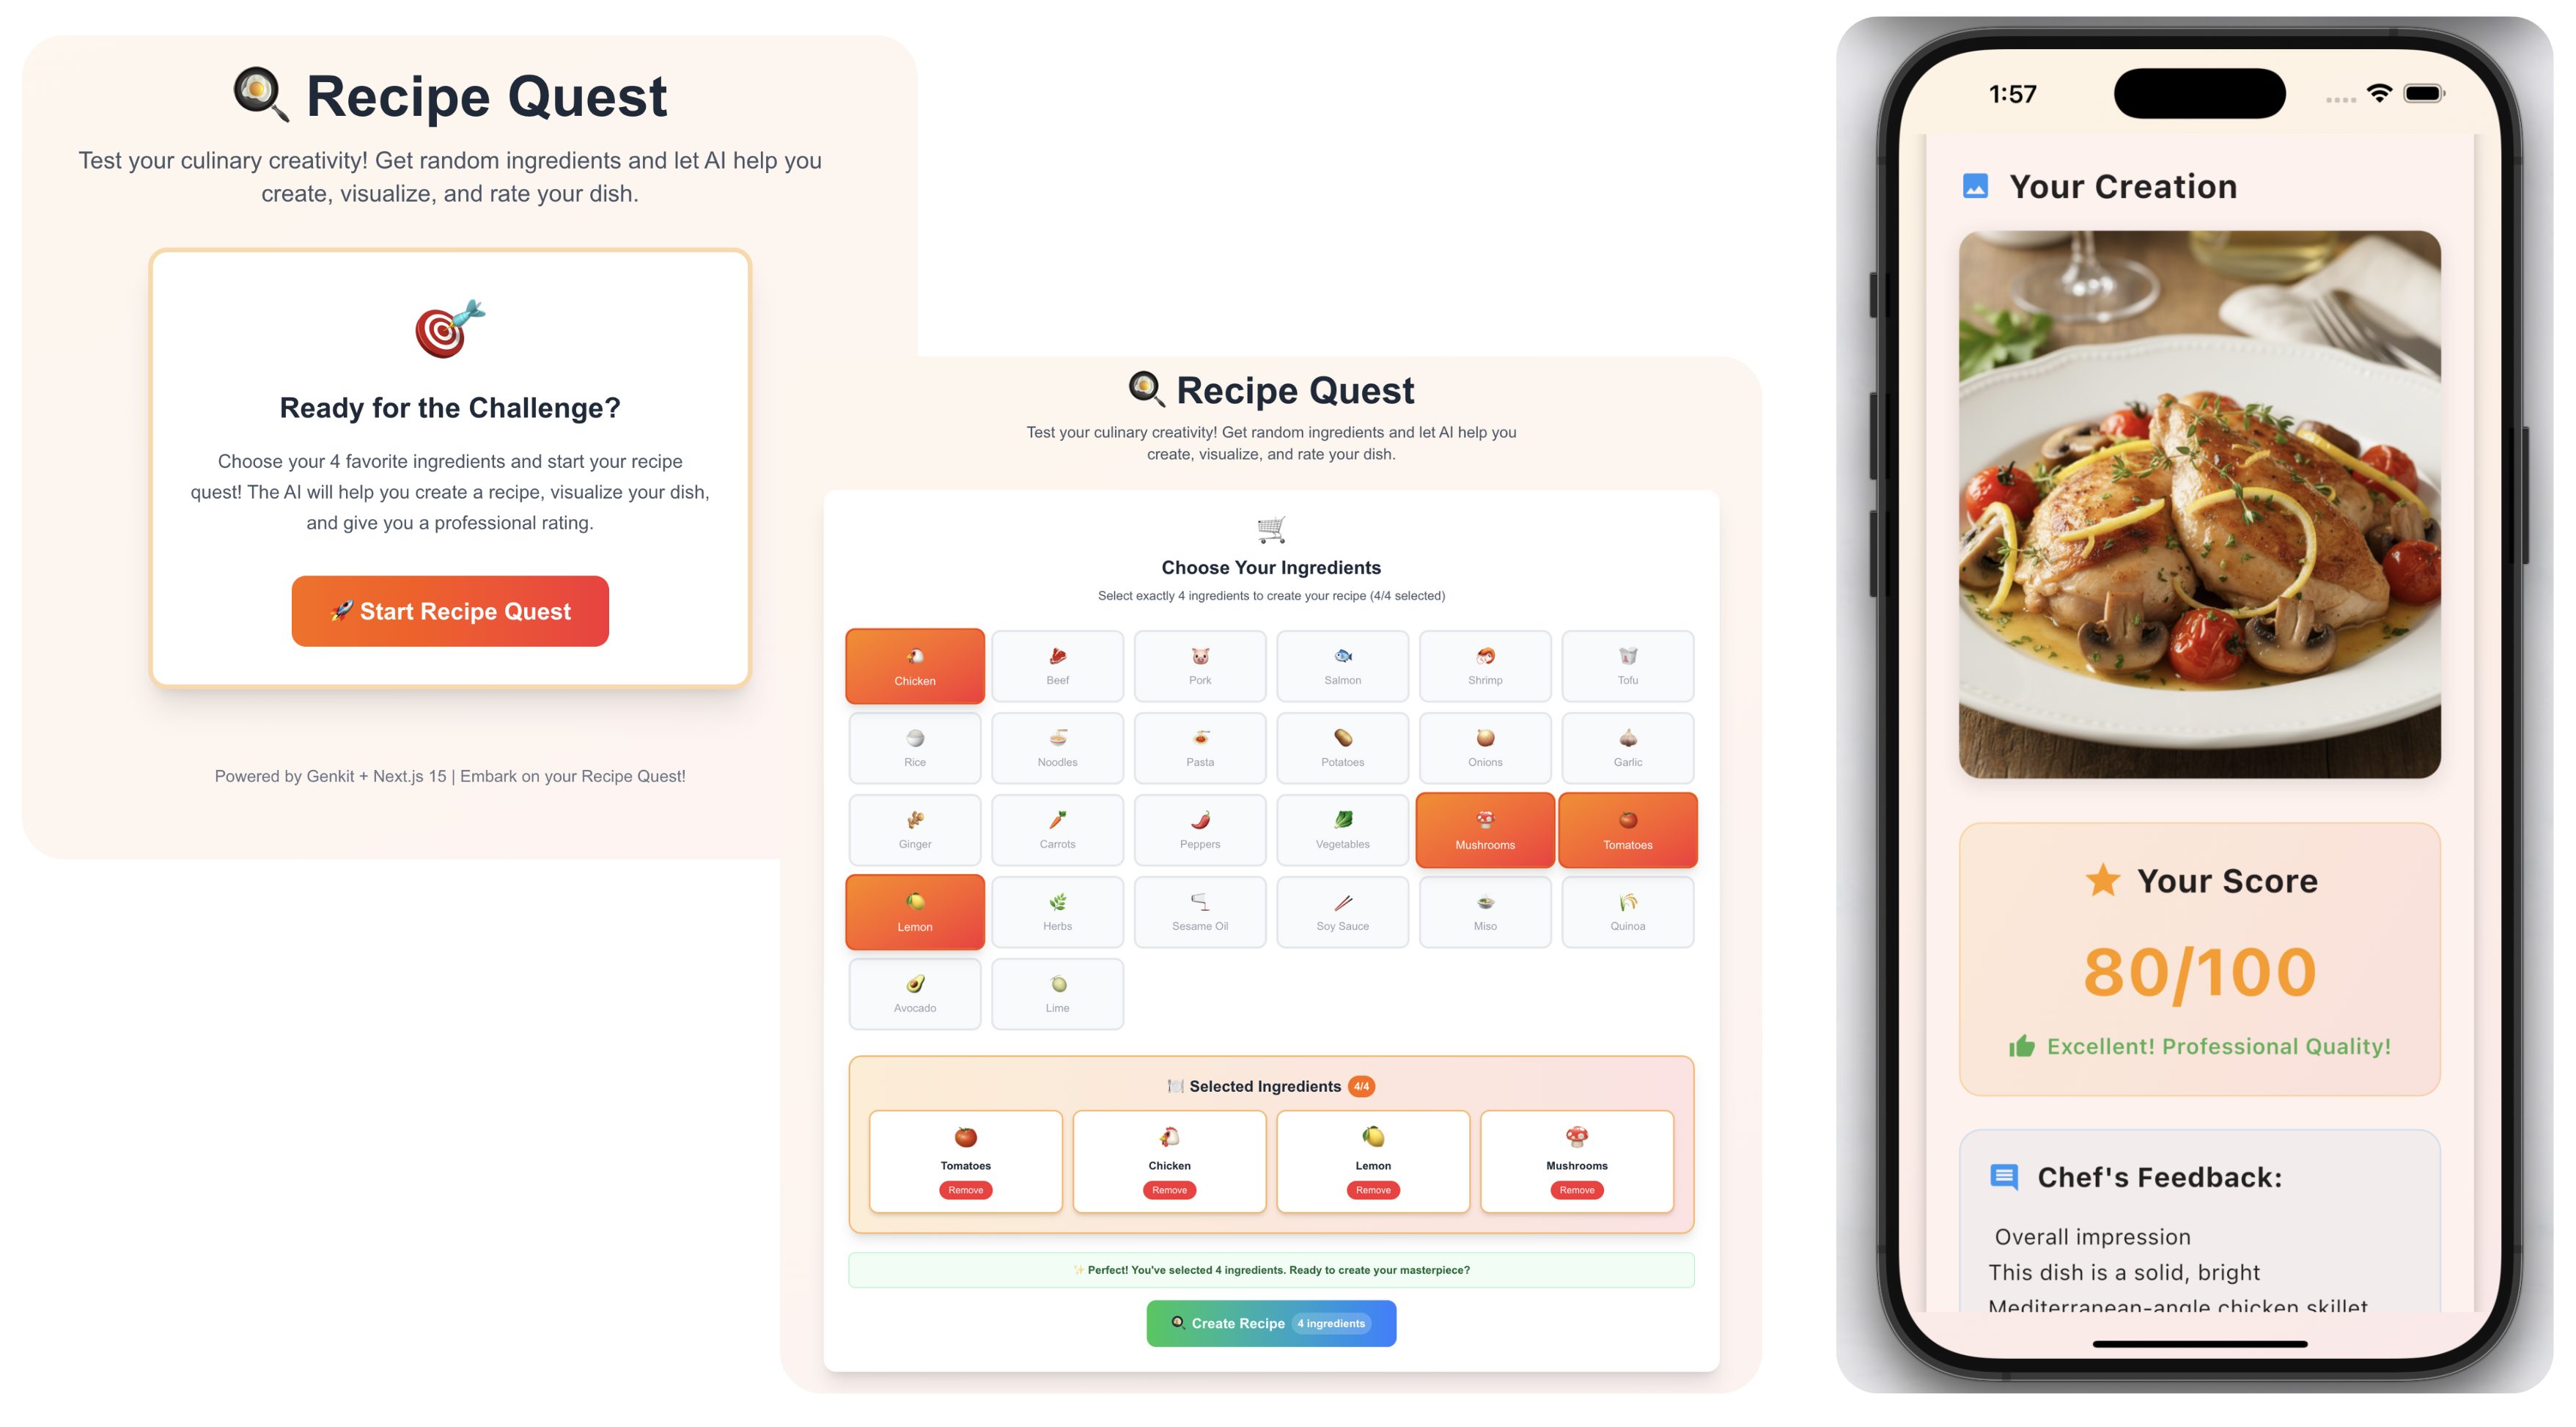
Throughout this chapter, we’ll create Recipe Quest - a gamified cooking application that demonstrates real-world client-server integration patterns. Recipe Quest challenges players to create recipes with randomly selected ingredients, visualize their dishes through AI-generated images, and receive professional evaluations of their culinary creativity.
Application Features
Recipe Quest includes the following gameplay flow:
- Players start the quest and receive 4 random ingredients
- The AI generates a complete recipe based on those ingredients
- An image of the finished dish is created using AI
- The dish receives a professional evaluation with a score (0-100)
- Players can retry with new ingredients to improve their score
Backend (Genkit Go Server)
The server implements three main flows:
- Recipe generation with real-time streaming using Server-Sent Events (SSE)
- Dish image creation using AI image generation
- Cooking evaluation that scores the creativity and feasibility
Two custom tools improve the experience:
- Firestore compatibility checker for ingredient validation
- Difficulty estimator for recipe complexity analysis
Firestore stores the cooking master data including ingredients, cooking methods, and evaluation criteria.
Clients
Flutter (iOS/Android): Cross-platform mobile application using Material Design and platform-specific UI adaptations
Angular (Web): Modern single-page application with Observable-based state management and custom styling
Next.js (Web): SSR/CSR application using React hooks and Tailwind CSS
Key Implementation Details
Each client handles:
- Real-time recipe streaming with proper buffering and display
- Image generation with loading states and error handling
- Gamified UI with progress tracking and animations
- Consistent error handling for network and AI failures
- Platform-specific optimizations for best user experience
Learning Objectives
By the end of this chapter, you’ll be able to:
- Design and implement a Genkit Go API server that serves multiple client types
- Handle streaming responses differently across Flutter, Angular, and Next.js
- Apply clean architecture principles to maintain consistency across platforms
- Implement proper error handling for AI-generated content in production
- Optimize user experience with loading states, animations, and platform-specific features
Prerequisites
Before diving into this chapter, ensure you have:
From Previous Chapters
- Completed Chapter 3 (Development Environment Setup)
- Understanding of Genkit flows and tools from Chapters 6 and 8
- Familiarity with streaming concepts from Chapter 7
Development Environment
- Go 1.23+ with Genkit Go SDK installed
- Node.js 20+ and npm for web clients
- Flutter 3.8+ SDK for mobile development
- Firebase CLI for Firestore emulator
- Terraform 1.5+ (optional, for production Firestore deployment)
- IDE Support: IDE with Go/Flutter/TypeScript extensions
API Keys
# Required environment variables
export OPENAI_API_KEY="your-openai-key"      # For recipe generation
export GEMINI_API_KEY="your-gemini-key"      # For image generation
Development Setup
# Firestore emulator (separate terminal)
export FIRESTORE_EMULATOR_HOST="127.0.0.1:8080"
firebase emulators:start --only firestore --import=./firestore-data/local
Platform-Specific Requirements
For Flutter Development
- Xcode (macOS only, for iOS development)
- Android Studio or Android SDK (for Android development)
- Physical device or emulator/simulator
For Web Development
- Modern web browser (Chrome/Firefox/Safari)
- Basic understanding of TypeScript and reactive programming
Why Multiple Clients?
You might wonder why we’re covering three different client frameworks. Here’s why this approach provides maximum value:
- Real-World Scenarios: Most organizations need to support multiple platforms
- Architectural Insights: Comparing implementations reveals best practices
- Reusable Patterns: Learn patterns that apply regardless of framework
- Framework Flexibility: Choose the right tool for your specific needs
Whether you’re building a startup MVP or an enterprise application, understanding how to integrate Genkit with different client technologies gives you the flexibility to deliver AI-powered experiences wherever your users are.
Let’s begin by exploring the overall architecture of our Recipe Quest system.
Application Architecture
Recipe Quest follows a clean client-server architecture where multiple frontend applications connect to a single Genkit Go API server. This design ensures consistency across platforms while leveraging each client framework’s strengths.
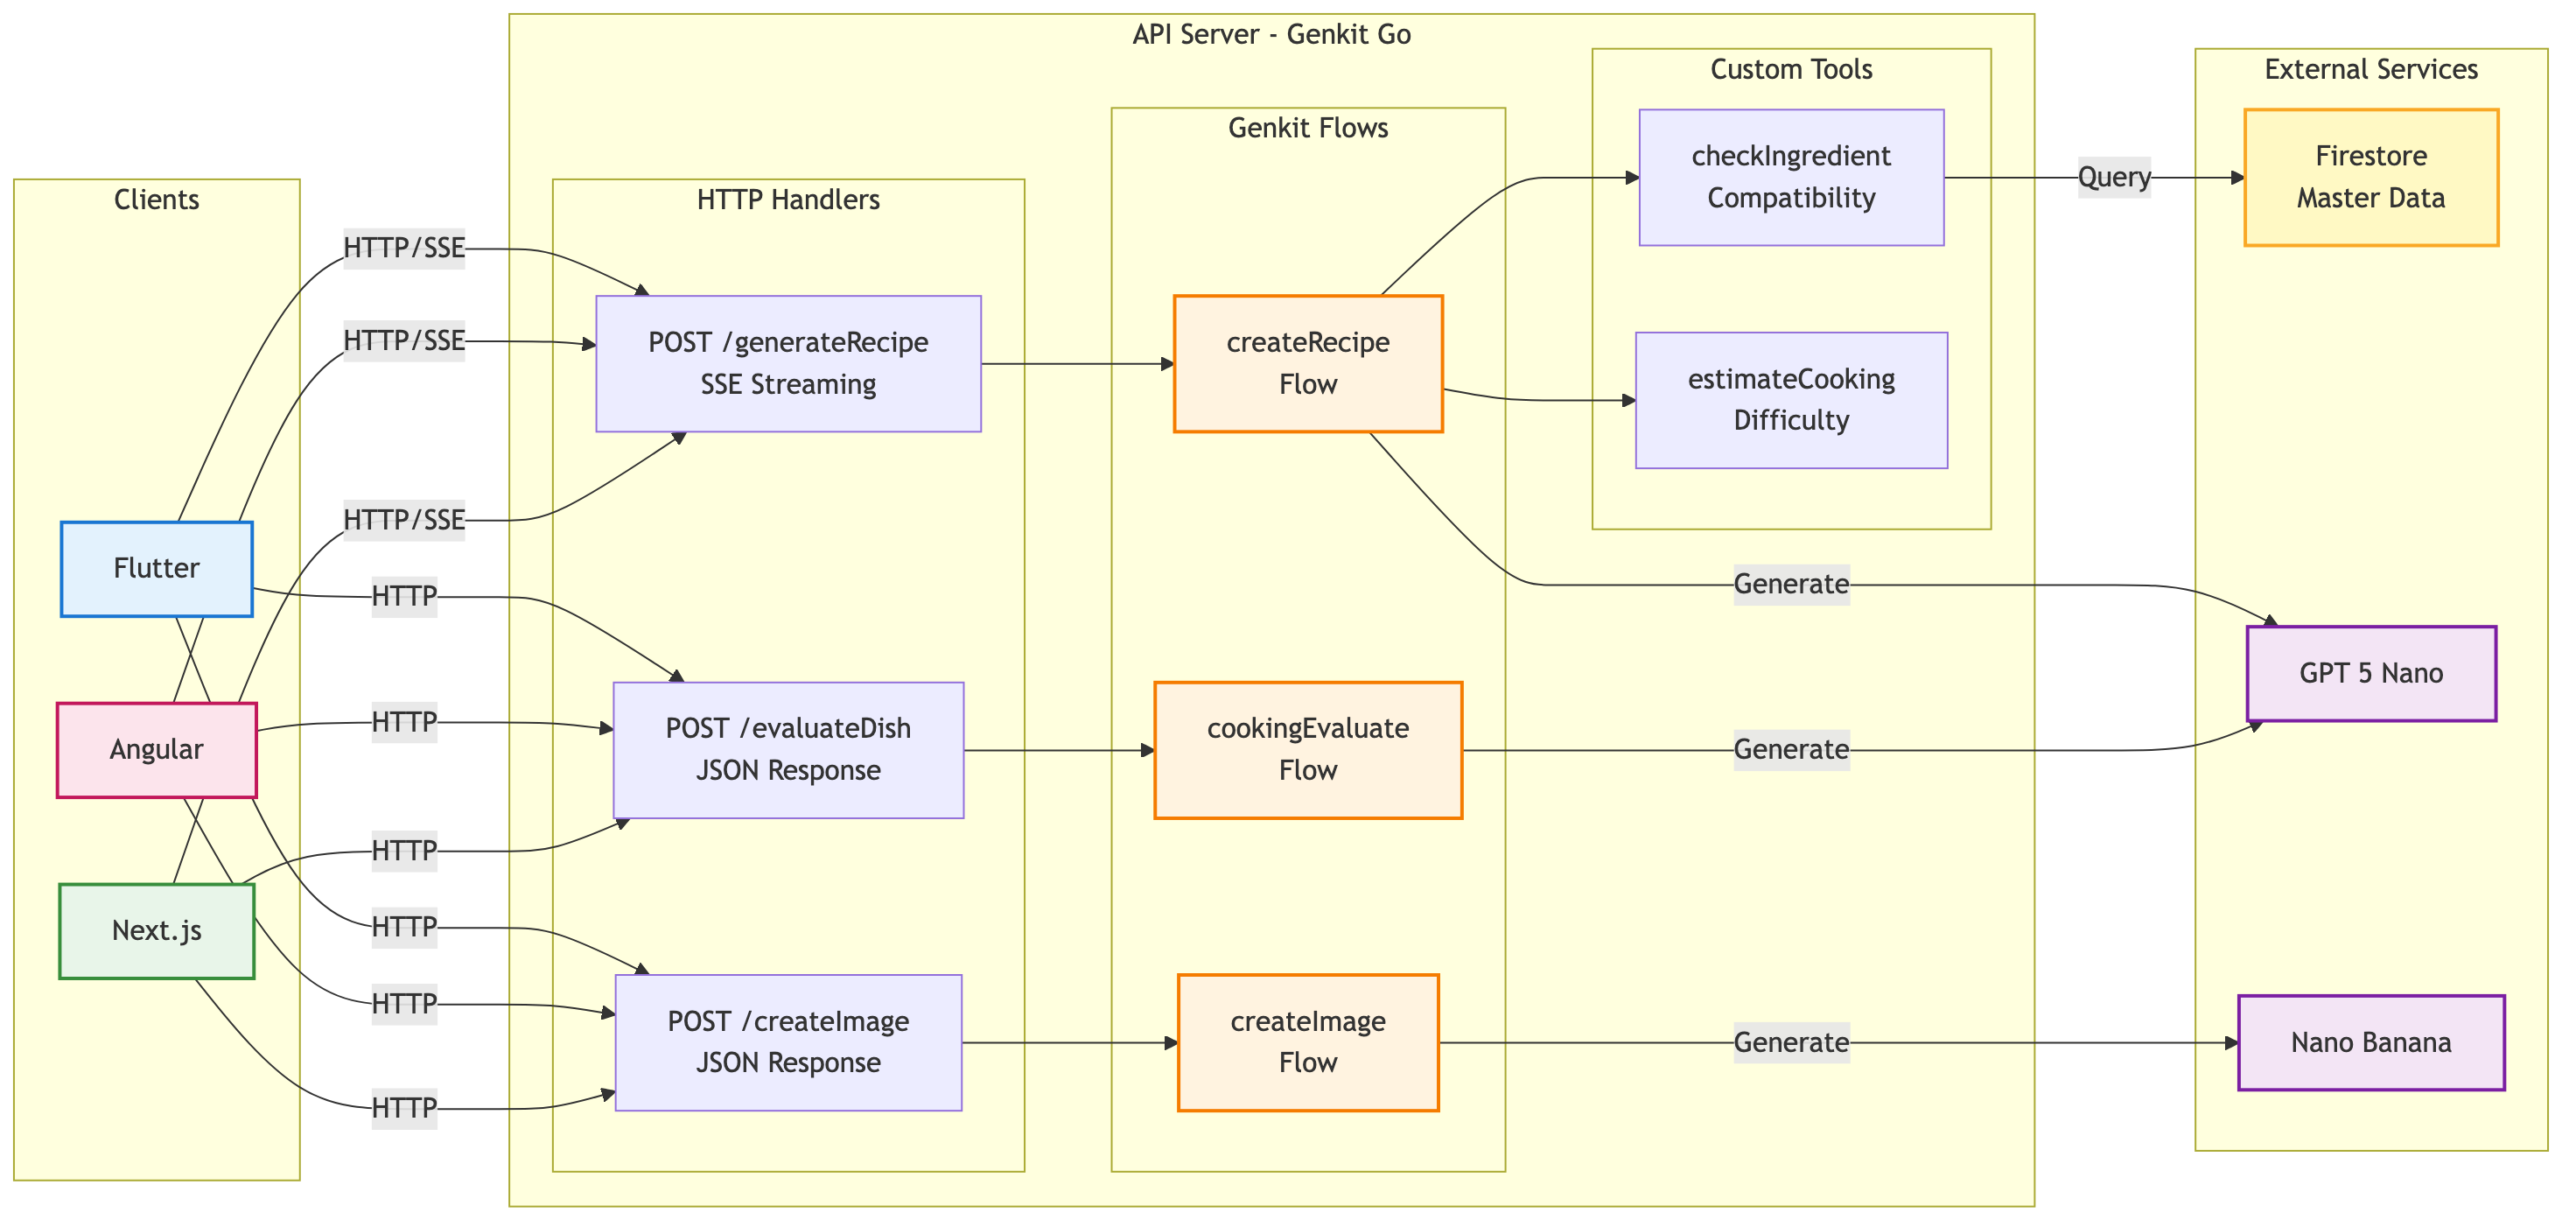
The architecture demonstrates several key principles:
- Unified API Surface: All clients communicate through the same HTTP endpoints, ensuring consistent behavior
- Protocol Flexibility: SSE for streaming recipe generation, JSON for discrete operations
- Tool Integration: Custom tools extend the AI’s capabilities with domain-specific logic
- External Service Abstraction: Clients remain agnostic to which AI services power each feature
API Server Design
The Genkit Go server forms the heart of Recipe Quest, orchestrating AI generations, managing tools, and providing a clean HTTP interface for clients. Let’s examine each component in detail.
HTTP Endpoints
The server exposes three main endpoints on port 9090, each corresponding to a gameplay phase:
| Endpoint | Method | Content Type | Purpose |
|---|---|---|---|
/generateRecipe |
POST | text/event-stream | Stream recipe generation in real-time |
/createImage |
POST | application/json | Generate dish visualization |
/evaluateDish |
POST | application/json | Score and provide feedback |
Each endpoint follows RESTful conventions while adapting to the specific needs of AI-powered features. The streaming endpoint uses Server-Sent Events (SSE) to deliver recipe content progressively, enhancing user experience with immediate feedback. All endpoints include CORS headers to support cross-origin requests from web clients.
Genkit Flows
Three flows power the Recipe Quest experience:
createRecipe Flow
The recipe generation flow combines multiple AI capabilities:
type RecipeRequest struct {
    Ingredients []string `json:"ingredients"`
}

type RecipeResponse struct {
    Type    string `json:"type"`    // "content", "done", "error"
    Content string `json:"content,omitempty"`
    Error   string `json:"error,omitempty"`
}
This flow uses two custom tools to check ingredient availability and estimate cooking difficulty. The streaming implementation sends initial status messages, processes the AI response in chunks for better user experience, and includes natural pauses at section boundaries. The flow uses OpenAI’s GPT-5-nano model with a professional chef system prompt.
createImage Flow
Image generation transforms the recipe into a visual representation:
type ImageRequest struct {
    DishName    string `json:"dishName"`
    Description string `json:"description"`
}

type ImageResponse struct {
    Success  bool   `json:"success"`
    ImageUrl string `json:"imageUrl"`
    DishName string `json:"dishName"`
    Error    string `json:"error"`
}
This flow uses Google’s Gemini 2.5 Flash Image (aka Nano Banana) model (googleai/gemini-2.5-flash-image-preview) to create photorealistic, appetizing dish images. The generated images are returned as base64-encoded data URIs with image modality configuration.
cookingEvaluate Flow
The evaluation flow provides gamification through detailed scoring:
type EvaluateRequest struct {
    DishName    string `json:"dishName"`
    Description string `json:"description"`
}

type EvaluateResponse struct {
    Success         bool   `json:"success"`
    Score           int    `json:"score"`
    Feedback        string `json:"feedback"`
    CreativityScore int    `json:"creativityScore"`
    TechniqueScore  int    `json:"techniqueScore"`
    AppealScore     int    `json:"appealScore"`
    Title           string `json:"title"`       // Chef title based on score
    Achievement     string `json:"achievement"` // Special achievement
    Error           string `json:"error"`
}
The evaluation analyzes three dimensions - creativity, technique, and appeal - to calculate an overall score. Based on the score, players receive chef titles (e.g., “Master Chef” for 90+) and special achievements. The flow uses structured output to ensure consistent JSON responses with detailed feedback.
Custom Tools
Recipe Quest implements two specialized tools that extend the AI’s domain knowledge:
checkIngredientCompatibility
This tool validates ingredient combinations against a curated Firestore database:
type CheckCompatibilityInput struct {
    Ingredients []string `json:"ingredients"`
}

type CompatibilityResult struct {
    Score           int      `json:"score"`           // 0-100
    Compatibility   string   `json:"compatibility"`   // excellent/good/fair/poor
    FlavorProfile   string   `json:"flavorProfile"`
    CuisineStyle    string   `json:"cuisineStyle"`
    Suggestions     []string `json:"suggestions"`
    WarningFlags    []string `json:"warningFlags"`
}
The tool queries Firestore for known ingredient combinations, calculates compatibility scores, and provides flavor profiles and cuisine style recommendations. It gracefully handles missing data by providing estimated compatibility based on ingredient categories.
estimateCookingDifficulty
Analyzes recipe complexity based on ingredients and cooking methods:
type EstimateDifficultyInput struct {
    Ingredients     []string `json:"ingredients"`
    CookingMethods  []string `json:"cookingMethods"`
    CookingSteps    int      `json:"cookingSteps"`
}

type DifficultyEstimate struct {
    Level             string   `json:"level"`      // beginner/intermediate/advanced/expert
    Score             int      `json:"score"`      // 0-100
    TimeEstimate      string   `json:"timeEstimate"`
    SkillsRequired    []string `json:"skillsRequired"`
    EquipmentRequired []string `json:"equipmentRequired"`
}
This tool calculates difficulty scores based on ingredient complexity, cooking techniques, preparation steps, and required equipment - all without external database queries.
Firestore Schema
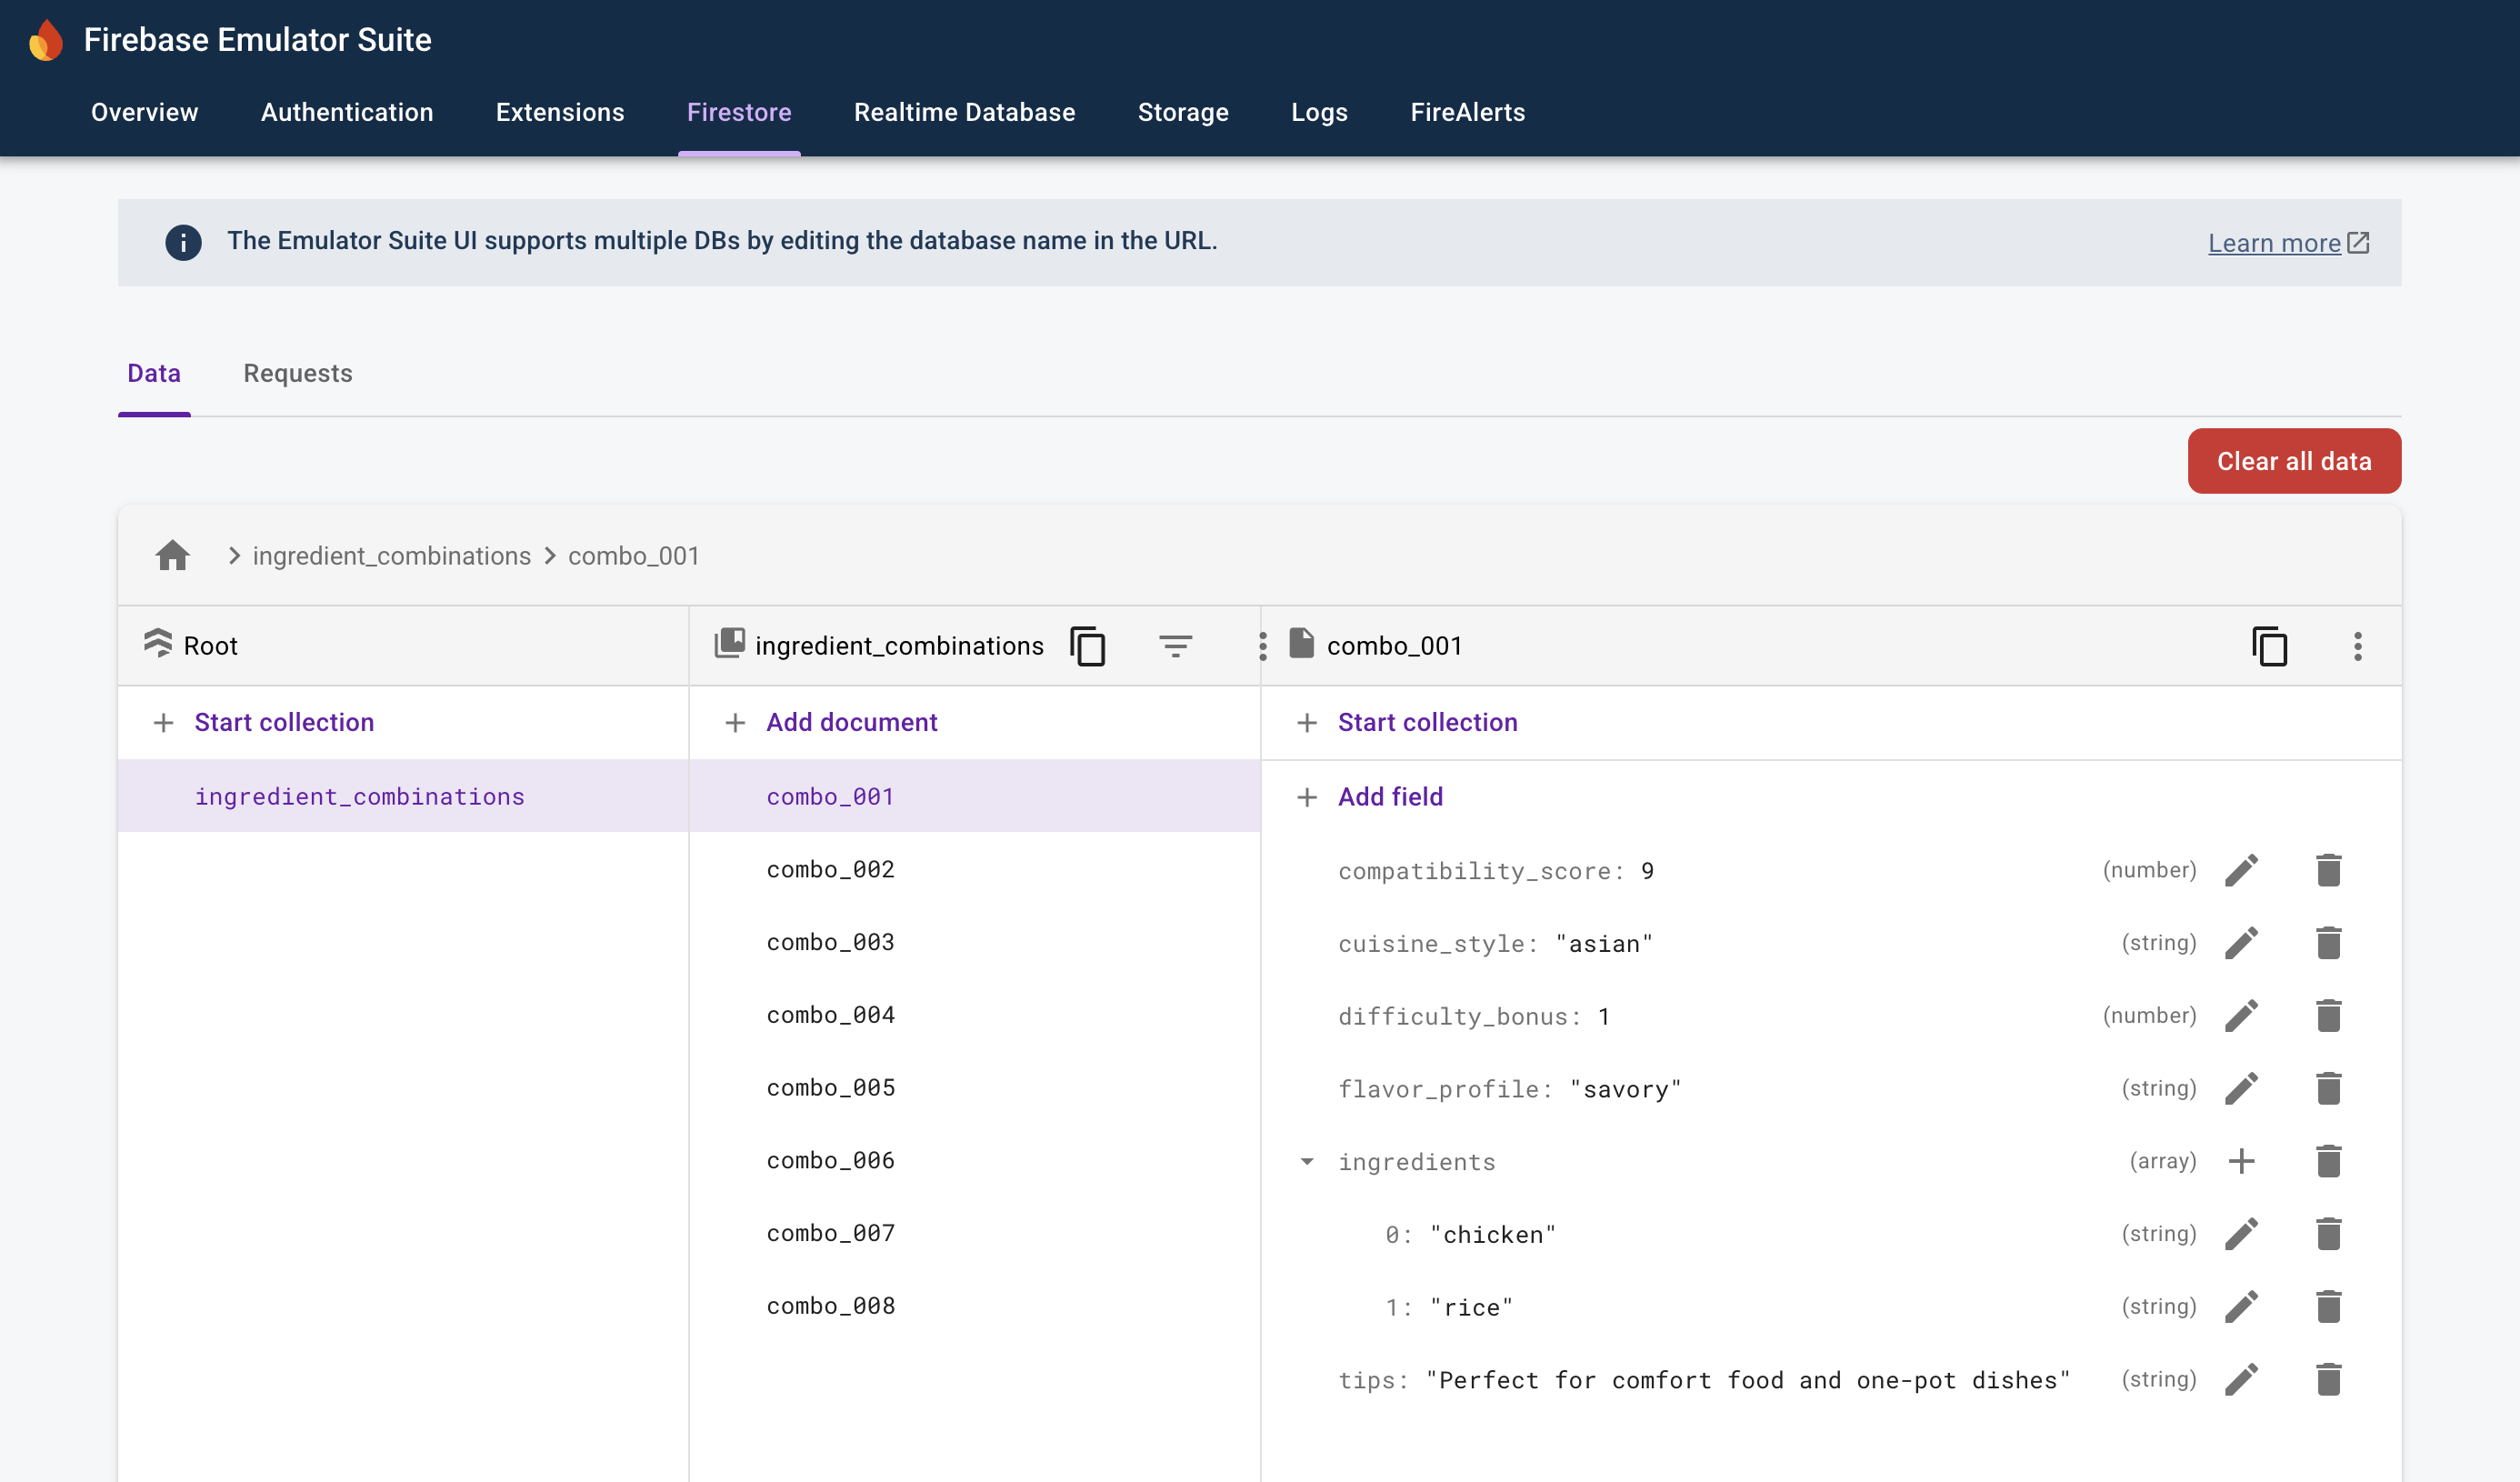
The master data in Firestore follows a structured schema optimized for ingredient compatibility lookups:
ingredient_combinations/
├── {combinationId}/
│   ├── ingredients: string[]      // Normalized, sorted ingredient list
│   ├── score: number             // Compatibility score (0-100)
│   ├── compatibility: string     // excellent/good/fair/poor
│   ├── flavorProfile: string     // e.g., "sweet and savory"
│   ├── cuisineStyle: string      // e.g., "fusion", "italian"
│   ├── suggestions: string[]     // Additional ingredient suggestions
│   └── warningFlags: string[]    // Potential issues or allergies
This schema enables fast lookups for ingredient combinations while providing rich metadata for better recipe generation. The normalized ingredient arrays ensure consistent matching regardless of input order.
Flow Execution Sequence
Understanding how these components interact helps in debugging and optimization:
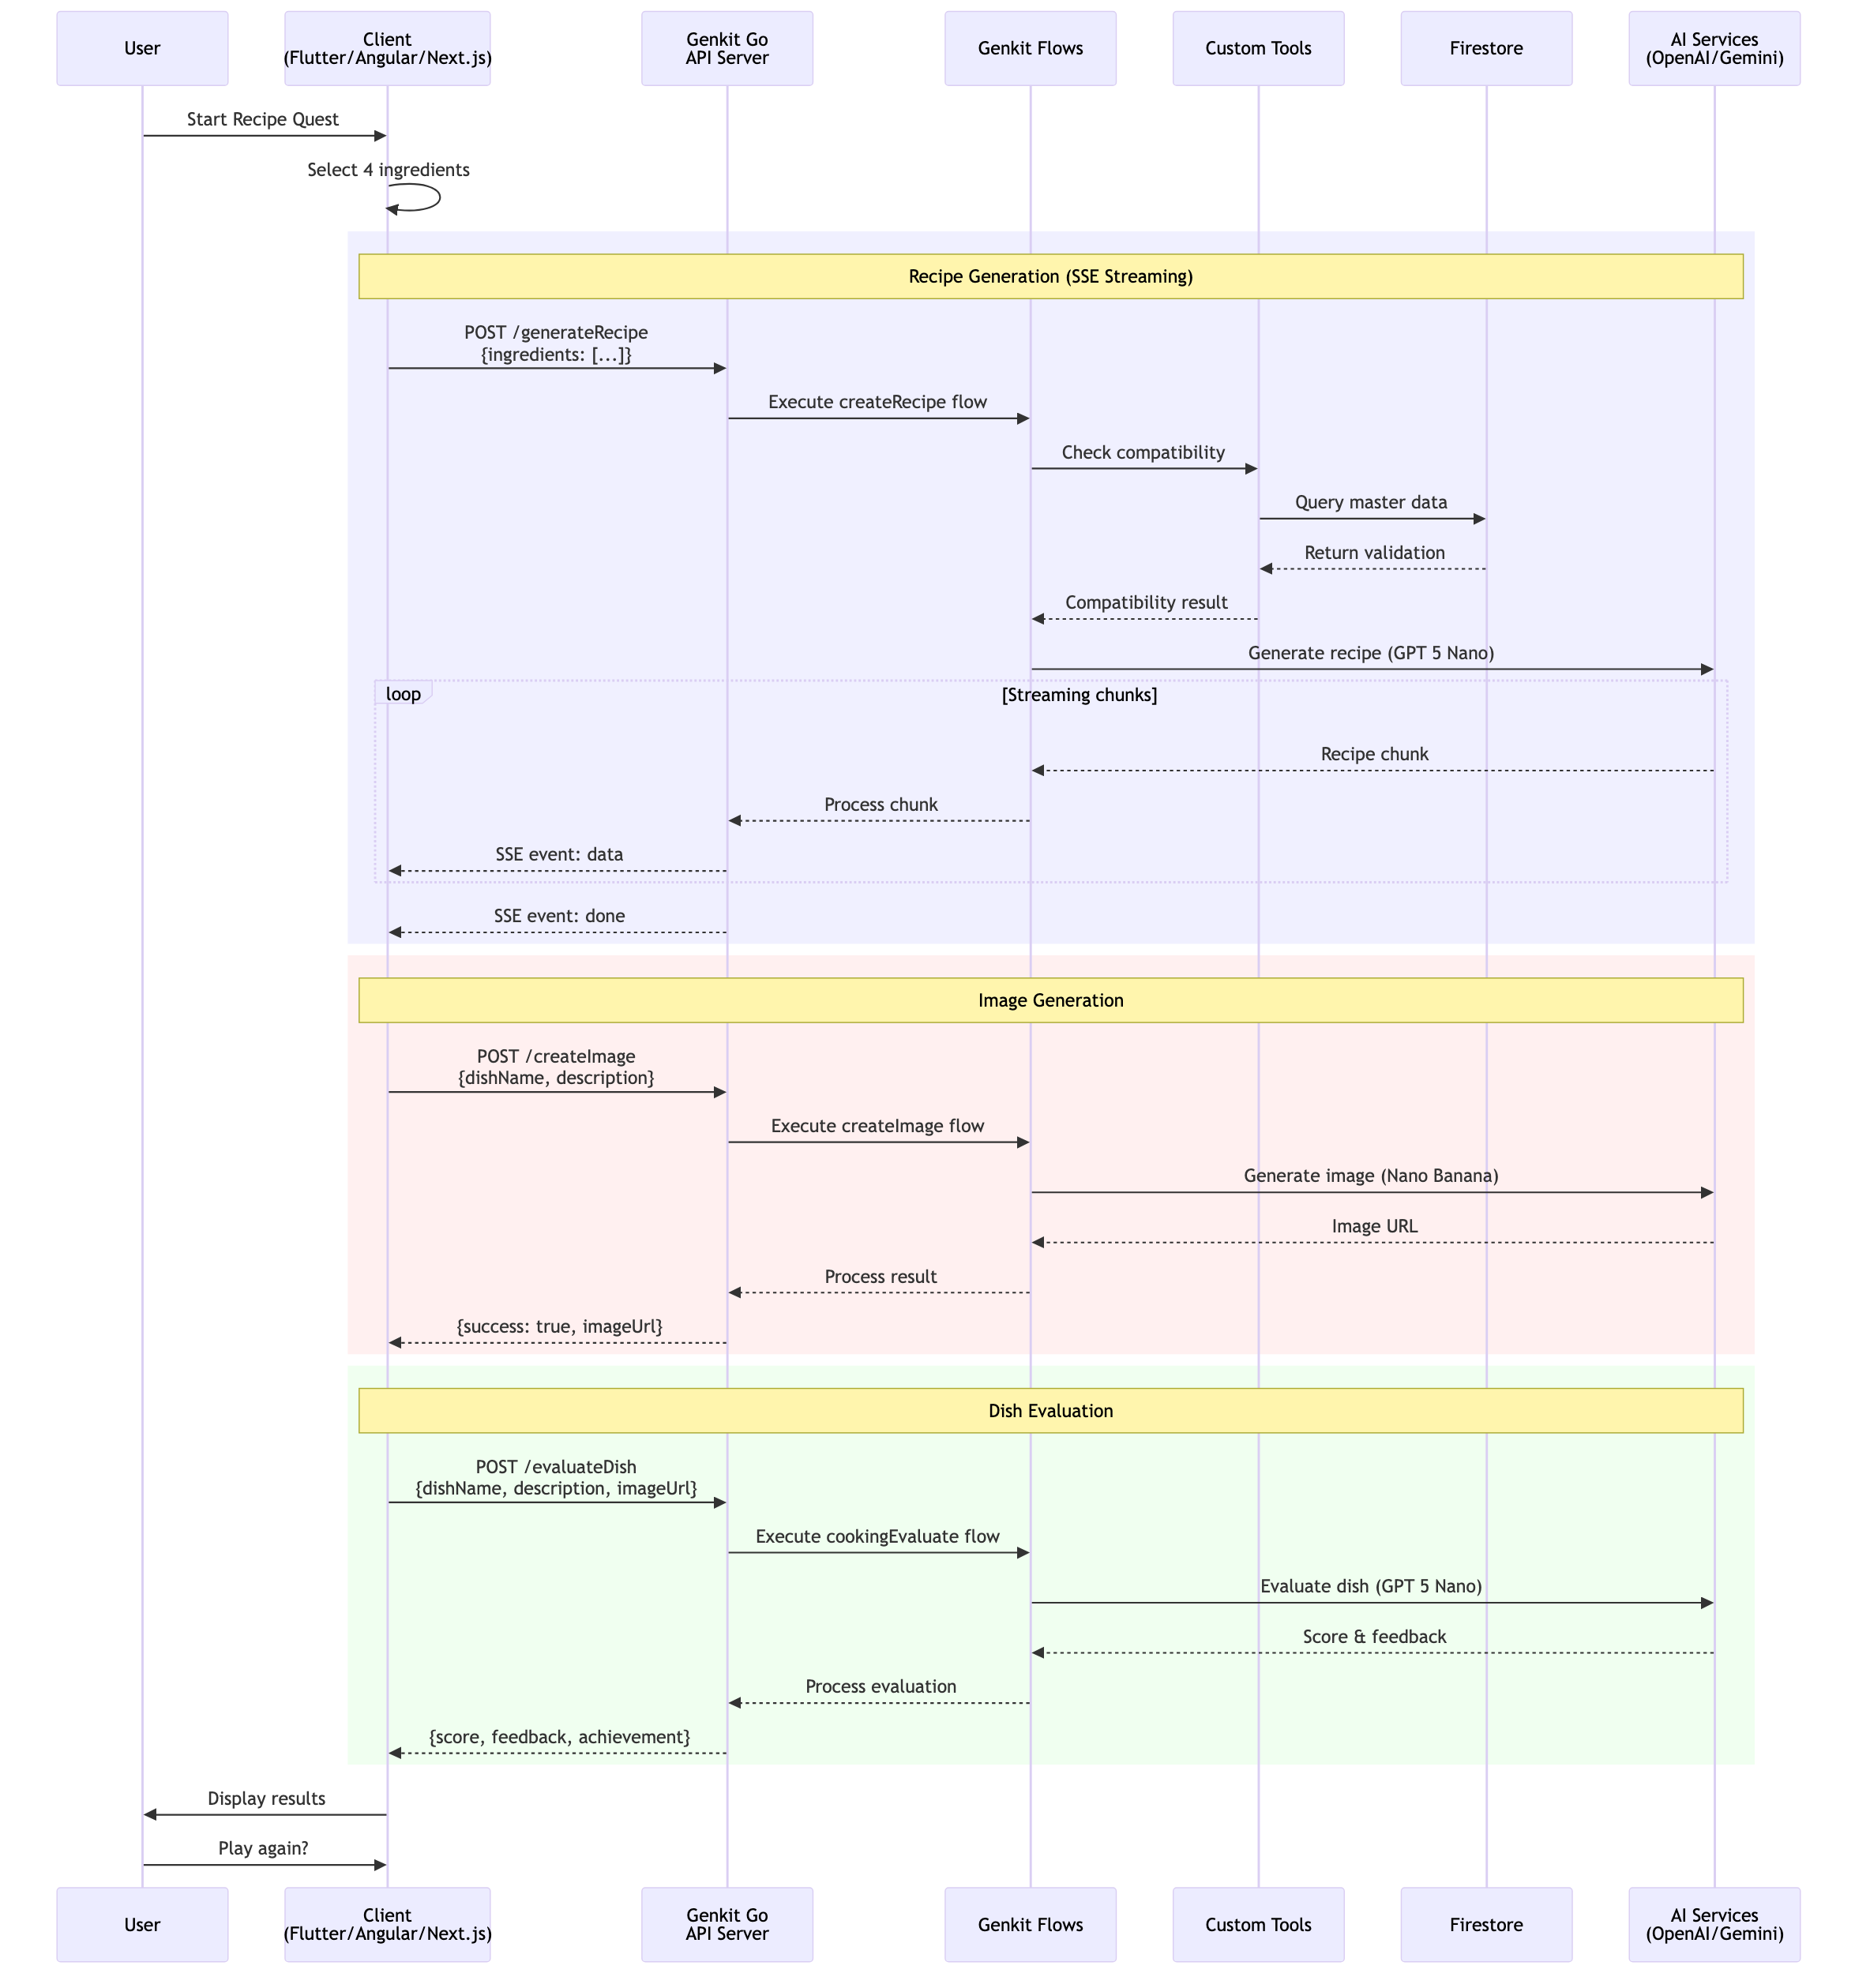
The sequence diagram illustrates the complete request-response cycle, showing how tools integrate with flows and when external services are called. This visualization helps developers understand timing, dependencies, and potential optimization points.
Client Architecture Comparison
Building three different clients for Recipe Quest provides valuable insights into how different frameworks handle the same requirements. Each client follows clean architecture principles while adapting to platform-specific conventions and capabilities.
Architecture Layers
All three clients implement a layered architecture, but with framework-specific adaptations:
Flutter Architecture
Flutter’s implementation uses the Genkit Dart client for direct integration: https://pub.dev/packages/genkit
lib/
├── domain/           # Business logic & interfaces
│   ├── models/       # Pure data models
│   └── repositories/ # Repository interfaces
├── infrastructure/   # External integrations
│   ├── actions/      # Genkit remote actions
│   └── repository/   # Repository implementations
├── usecases/        # Application business rules
└── presentation/    # UI layer
    ├── providers/   # Riverpod state management
    └── widgets/     # UI components
The Flutter client benefits from Genkit’s native Dart support, providing type-safe remote actions and built-in streaming capabilities through defineRemoteAction.
Angular Architecture
Angular follows a similar structure with TypeScript refinements:
src/
├── domain/          # Core business entities
│   ├── models/      # Domain models with Zod validation
│   └── repositories.ts
├── infrastructure/  # HTTP implementation
│   └── http/
│       ├── client/  # HTTP utilities
│       ├── dto/     # Data transfer objects
│       └── mappers/ # DTO↔Domain converters
├── usecases/       # Business operations
└── app/            # Angular components
    ├── services/   # State management
    └── quest/      # Feature component
Angular emphasizes dependency injection and uses RxJS for reactive state management, manually handling SSE streaming through the Fetch API.
Next.js Architecture
Next.js combines server and client capabilities:
app/                # App Router (React 19)
├── hooks/          # Custom React hooks
└── quest/          # Page component
src/
├── domain/         # Shared domain logic
├── infrastructure/ # HTTP implementation
├── usecases/      # Business logic
└── components/    # React components
Next.js uses React 19 features with client-side rendering for the game interface, sharing infrastructure code with Angular but using React hooks for state management.
Streaming Implementation Comparison
The most significant difference between clients lies in how they handle streaming recipe generation. Each framework takes a unique approach:
Flutter: Native Genkit Streaming
Flutter uses Genkit’s Dart client for clean streaming:
Stream<RecipeResponse> generateRecipe(RecipeRequest request) {
  final action = RecipeQuestActions.generateRecipe;
  final actionStream = action.stream(input: request);

  // Treat ActionStream purely as Stream<RecipeResponse>; callers only need chunks.
  return actionStream.handleError((error, stackTrace) {
    return RecipeResponse.error('Failed to generate recipe: $error');
  });
}
Benefits:
- Type-safe streaming with automatic serialization
- Built-in error handling and retry logic
- Optional access to
onResult/resultif you ever need the final payload, while keeping domain layers focused on the chunked stream by default
Angular & Next.js: Manual SSE Handling
Both web clients implement custom SSE parsing:
async *generateRecipe(request: RecipeRequestDomain): AsyncGenerator<RecipeResponseDomain> {
  const response = await fetch(url, {
    headers: { 'Accept': 'text/event-stream' },
    body: JSON.stringify({ data: dto })
  });

  const reader = response.body!.getReader();
  const decoder = new TextDecoder();
  let buffer = '';

  while (true) {
    const { done, value } = await reader.read();
    if (done) break;

    buffer += decoder.decode(value, { stream: true });
    // Parse SSE events and yield domain objects
  }
}
Challenges:
- Manual buffering and chunk reassembly
- SSE event parsing (
data: {...}format) - Handling Genkit’s response wrapper structure
Running Recipe Quest
Let’s get Recipe Quest up and running! This section walks you through the setup process step by step.
Environment Setup
First, configure the required environment variables for AI services:
# Required API keys
export OPENAI_API_KEY="your-openai-key"      # For recipe generation
export GEMINI_API_KEY="your-gemini-key"      # For image generation
Starting the Firestore Emulator
Recipe Quest uses Firestore to store ingredient compatibility data. The project includes pre-configured master data that can be imported into the Firestore emulator.
Start the Firestore emulator with the included data:
# Terminal 1: Start Firestore emulator
cd src/examples/chapter-15/server
firebase emulators:start --only firestore --import=./firestore-data/local
The --import=./firestore-data/local flag automatically loads the ingredient combination data from the local export directory. This data includes pre-configured ingredient compatibilities, flavor profiles, and cuisine styles needed for the game.
For the Genkit Go server to connect to the Firestore emulator, set the environment variable:
export FIRESTORE_EMULATOR_HOST="127.0.0.1:8080"
According to the Firebase documentation (https://firebase.google.com/docs/emulator-suite/connect_firestore#admin_sdks), the Firebase Admin SDKs automatically connect to the Cloud Firestore emulator when this environment variable is set. This allows your Genkit server to use the Firestore emulator instead of a production database.
Starting the Genkit Go API Server
With the Firestore emulator running, start the Genkit Go server in a new terminal:
# Terminal 2: Start Genkit server
cd src/examples/chapter-15/server
genkit start -- go run .
The genkit start command launches the Genkit developer UI on port 4000 while running your Go server on port 9090. You can access the Genkit UI at http://localhost:4000 to monitor flows, test individual components, and debug your application.
The server will:
- Connect to the Firestore emulator automatically
- Initialize the three flows (createRecipe, createImage, cookingEvaluate)
- Start listening on http://localhost:9090
Starting the Clients
With both the Firestore emulator and Genkit server running, you can now start any of the three client applications. Each client is pre-configured to connect to http://localhost:9090.
Flutter Client
# Terminal 3: Start Flutter client
cd src/examples/chapter-15/client/flutter
flutter pub get
flutter run
Choose your target device when prompted. The Flutter client supports:
- iOS Simulator
- Android Emulator
Angular Client
# Terminal 3: Start Angular client
cd src/examples/chapter-15/client/angular
npm install  # First time only
npm run build
npm run dev
Access the Angular client at http://localhost:4200. The development server includes hot module replacement for rapid development.
Next.js Client
# Terminal 3: Start Next.js client
cd src/examples/chapter-15/client/next
npm install  # First time only
npm run build
npm run dev
Access the Next.js client at http://localhost:3000. The development server uses Fast Refresh for instant feedback during development.
Verifying the Setup
Once all services are running, verify your setup:
- Firestore Emulator: Check http://localhost:4040/firestore for the Firestore UI
- Genkit Developer UI: Browse to http://localhost:4000 to see your flows
- API Server: Test http://localhost:9090
- Client Applications: Launch any client and start a new game
If everything is configured correctly, you should be able to:
- Select ingredients and see them validated against Firestore data
- Watch the recipe stream in real-time as it’s generated
- Generate images of your dishes
- Receive evaluations with scores and achievements
Summary
Throughout this chapter, you’ve learned how to integrate a Genkit Go backend with three different client frameworks. The Recipe Quest application demonstrates real-world patterns for:
- Building a unified API that serves multiple client types
- Handling streaming AI responses across different platforms
- Implementing clean architecture principles consistently
- Setting up and managing development environments
Key takeaways:
-
Genkit’s Flexibility: The same Go backend serves both web and mobile clients with appropriate protocols (SSE for streaming, JSON for discrete operations).
-
Framework Strengths: Each client framework brings unique advantages - Flutter’s native performance, Angular’s enterprise patterns, and Next.js’s modern React ecosystem.
-
Streaming Complexity: While Flutter’s Genkit client simplifies streaming, web clients require careful SSE handling but provide full control.
-
Development Environment: Coordinating multiple services (Firestore emulator, Genkit server, clients) requires systematic setup but enables rapid development.
Happy cooking with AI!!